A great question to ask is how to amplify your WordPress website’s footprint and make your mark on platforms like Pinterest.
Verifying your WordPress site on Pinterest is a pivotal move, not just for enhancing your site’s credibility but also for unlocking a treasure trove of Pinterest’s rich features.
Whether you’re a blogger, a business owner, or a digital marketer, understanding how to verify your WordPress site on Pinterest can transform your approach to online engagement and visibility.
In this guide, we’ll embark on a step-by-step journey to seamlessly verify your WordPress website, ensuring it stands out in the vibrant Pinterest community.
From setting up your Pinterest business account to optimizing your site post-verification, each step is designed to ensure your content resonates, your brand’s story is told, and your digital presence is felt.
So, let’s begin to uncover how to verify WordPress site on Pinterest, where every pin and every click can lead to new discoveries and opportunities.
Site Verification on Pinterest: What’s It All About?

Embarking on your Pinterest journey, you’ll encounter a crucial milestone known as Pinterest site verification.
This process is similar to receiving a seal of authenticity, a nod from Pinterest that confirms your website’s ownership.
It paves the way for a deeper integration with the platform. Let’s unravel the layers of site verification and its pivotal role in fortifying your website’s presence on Pinterest.
The Essence of Pinterest Site Verification
Site verification on Pinterest is essentially a process of proving ownership of your website.
By adding a specific HTML file or HTML tag provided by Pinterest to your website, you create a verified link between your website and your Pinterest account.
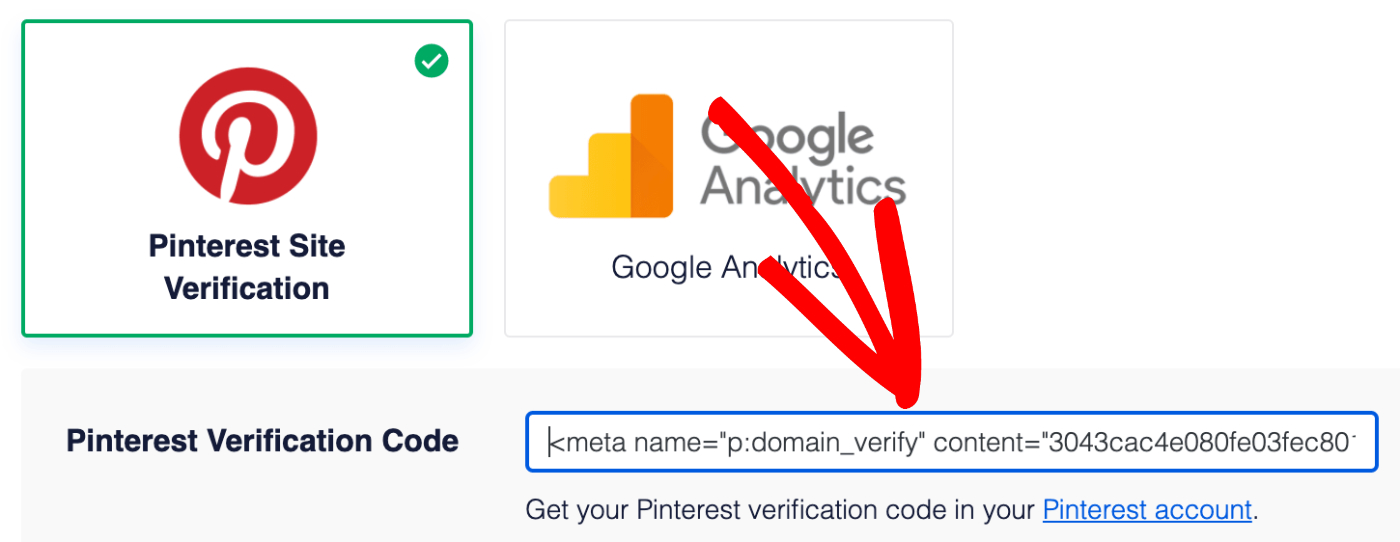
This verification is a badge of authenticity, assuring Pinterest and its users that your website is the genuine source of your content.
Its Role in Authenticating Site Ownership:
Authenticity is the currency of the digital world, and site verification is your proof of authenticity on Pinterest.
It tells Pinterest and its community that your website is a trustworthy source, safeguarding your content’s integrity and ensuring it’s attributed correctly.
Its Contributions to Online Presence and Pinning Features
Pinterest offers added perks like improving your online presence and access to advanced pinning features. Let’s examine these benefits in detail.
1. Enhancing Online Presence:
Verified websites on Pinterest enjoy a more prominent online presence. Your website’s link becomes visible on your Pinterest profile, lending credibility and inviting users to explore more of your content.
This direct connection not only boosts your website’s traffic but also strengthens your brand’s identity on the platform.
2. Access to Advanced Pinning Features:
Verification unlocks advanced features that enrich the pinning experience. Rich pins, for instance, pull additional information from your site, such as article titles, product prices, or recipe details, making your pins more informative and engaging.
These enhanced pins stand out in the sea of visuals, drawing more attention and interaction.
3. Leveraging Pinterest Analytics:
With a verified site, you gain access to Pinterest Analytics, a treasure trove of insights about how users interact with your pins.
Understanding which content resonates, how users discover your pins, and what drives engagement allows you to tailor your strategy, refine your content, and amplify your impact on the platform.
In essence, Pinterest site verification is more than a technicality; it’s a strategic move that solidifies your website’s authenticity, enhances your presence, and unlocks features that transform how your content is experienced on Pinterest.
As we move forward, we’ll guide you through the practical steps of adding the necessary HTML file or HTML tag to your website, marking the beginning of a new chapter in your Pinterest story.
Setting Up a Pinterest Business Account

Embarking on a Pinterest journey begins with laying the foundation – setting up a Pinterest business account.
This step is not just about stepping into the Pinterest arena; it’s about setting yourself up with the tools and analytics essential for a strategic presence on the platform.
Let’s guide you through creating your business account and highlight the advantages it holds over a personal account.
- Visit Pinterest for Business: Start by navigating to the Pinterest for Business page. Here, you’ll find the option to create a new business account, which is your gateway to a more professional presence on Pinterest.
- Sign Up for a Business Account: You can sign up for a new business account or convert your existing personal account to a business one. If you’re starting fresh, click ‘Join as a Business’ and fill in your details, including your email, password, and business name.
- Input Your Website URL: During the setup, you’ll be asked to input your website URL. This is a crucial step, as it’s the first move towards linking your website with your Pinterest presence.
- Complete the Setup: Follow the prompts to complete your account setup. You’ll be asked to choose topics relevant to your business, helping Pinterest tailor your experience and recommendations.
Advantages of a Business Account Over a Personal Account
- Access to Pinterest Analytics: One of the standout benefits of a business account is access to Pinterest Analytics. This tool offers invaluable insights into how your content performs, who your audience is, and how users interact with your pins.
- Rich Pins Functionality: Business accounts can use Rich Pins. These pins give more context about an idea because they show added information directly on the pin itself.
- Ad Campaigns: With a business account, you have the option to create ad campaigns, promoting your pins to reach a greater audience and direct more traffic to your website.
- Brand Presence: A business account allows you to display your brand name and logo prominently, lending credibility and recognition to your Pinterest presence.
- Educational Resources: Pinterest provides business account holders with exclusive access to resources, guides, and webinars, helping you optimize your presence and grow your reach on the platform.
By setting up a Pinterest business account, you’re not just entering a new realm; you’re equipping yourself with the tools, analytics, and features necessary to carve out a major presence on the platform.
In the next section, we’ll cover how to prepare your WordPress site for the verification process, ensuring a seamless connection between your site and your Pinterest business account.
Preparing Your WordPress Site for Verification
Before you can showcase your website on Pinterest and tap into the platform’s vast potential, it’s vital to make certain that your WordPress site is primed and ready for verification.
This preparation is like setting the stage for a successful performance, where every element works in harmony to create a seamless experience.
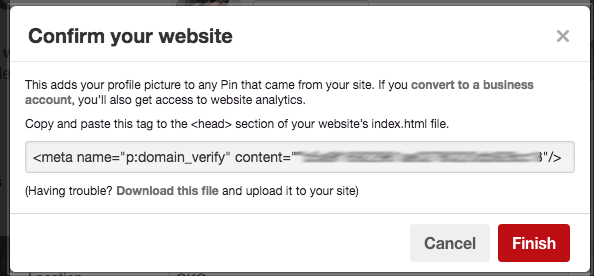
Let’s walk through the steps to prepare your site for verification, generating and adding the necessary Pinterest meta tag or HTML tag, and the best practices for adding code to your site.
1. Ensuring Your WordPress Site is Ready for Verification
- Ensure Website Accessibility: Your website should be live and accessible to the public. Pinterest needs to access your site to verify the Pinterest HTML tag, so ensure there are no maintenance modes or access restrictions in place.
- Update Your Site’s Content: Make sure your website’s content is updated and reflective of your brand. Pinterest users who visit your site from the platform will expect consistency and relevance.
- Check Site Load Times: A fast-loading site not only provides a better user experience but also ensures that Pinterest can quickly verify the HTML tag. Consider optimizing images, utilizing caching, and addressing any performance issues.
2. Generating and Adding the Pinterest HTML Tag or Meta Tag
- Access Your Business Pinterest Account: Log in to your business Pinterest account and navigate to the Settings menu.
- Navigate to the Claim Website Section: In your account settings, find the ‘Claim’ section. Here, you’ll enter your website URL and initiate the process to claim your site.
- Select the HTML Tag Option: Pinterest provides several methods to verify your site. Choose to verify by adding an HTML tag (also known as a meta tag) to your site’s code.
- Copy the Provided HTML Tag: Pinterest will generate a unique HTML tag for your website. Copy this tag; you’ll need to add it to your WordPress site’s header to complete the verification.
- Log onto Your WordPress Dashboard: Log into your WordPress site and navigate to the dashboard. This is your control center, where you’ll make the crucial changes.
- Open the Theme Editor: In the dashboard, click on ‘Appearance’ and then ‘Theme Editor.’ You’ll be interacting with the code that shapes your site’s appearance and functionality.
- Locate the Header File: Within the Theme Editor, find the ‘header.php’ file. This file typically contains the <head> section where the Pinterest HTML tag or meta tag will be added.
- Add HTML Tag to Your WordPress Site: Paste the Pinterest HTML tag you copied from your Pinterest account into the <head> section of your header.php file. Place it before the closing </head> tag to ensure it loads correctly.
- Update and Save: After inserting the tag, double-check to ensure it’s correctly placed. Then, you can save your modifications by clicking the ‘Update File’ button.
3. Best Practices for Adding Code to Your Site
- Backup Your Site: Before making any changes, ensure you have a recent backup of your site. This provides a safety net in case you need to revert to a previous state.
- Double-check the Tag: Ensure the Pinterest HTML file tag or meta tag is exactly as provided, with no typos or alterations. Even a minor mistake can prevent successful verification.
- Clear Cache After Changes: If you’re using a caching plugin or service, clear your site’s cache after saving the changes. This ensures that Pinterest sees the most recent version of your site, including the newly added HTML tag.
- Monitor Site Performance: After adding the tag, monitor your site to ensure there are no unexpected issues or changes in performance. Adding an HTML tag should not affect your site’s load times or functionality.
By meticulously preparing your WordPress site, carefully adding the Pinterest HTML tag or meta tag, and adhering to best practices, you’re setting the stage for a successful verification process.
This verification not only solidifies your presence on Pinterest but also opens the door to a wealth of analytics and features that can propel your site to new heights.
In the next sections, we’ll guide you through the verification process on Pinterest.
Verifying Your WordPress Site on Pinterest

With the Pinterest HTML tag now part of your WordPress site’s blueprint, the final step in cementing your relationship with Pinterest is the verification process.
This crucial phase is where Pinterest acknowledges the connection with your site, officially recognizing it as a trusted source.
Let’s navigate through the verification process and address any potential hiccups you might encounter along the way.
Completing the Verification Process on Pinterest
- Return to Your Pinterest Account: Log into your Pinterest business account and head over to the settings.
- Navigate to the Claim Website Section: Find the ‘Claim’ section where you initially entered your website’s URL.
- Initiate the Verification: Next to your website’s URL, you’ll see a button to verify your site. Clicking this prompts Pinterest to look for the HTML tag you’ve added to your WordPress site.
- Await Confirmation: Pinterest will now check your site for the HTML tag. If the tag is correctly placed, Pinterest will verify your site, and you’ll receive a confirmation message.
Troubleshooting Verification Issues
If the verification doesn’t proceed as expected, here are some troubleshooting tips:
- Recheck the HTML Tag Placement: Ensure the Pinterest HTML tag is correctly placed in the <head> section of your site’s header. It should be before the closing </head> tag.
- Clear Cache: If you use a caching plugin on your WordPress site, clear the cache. Caching can sometimes serve an older version of your site, hindering Pinterest from detecting the new HTML tag.
- Check for Typos: Make sure the HTML tag added to your site matches exactly with the one provided by Pinterest. Even a small typo can disrupt the verification process.
- Be Patient: Sometimes, it takes a little time for the changes to propagate and for Pinterest to recognize the HTML tag. If verification fails initially, wait for a few minutes and try again.
- Use Pinterest Help Center: If you’re still encountering issues, Pinterest’s Help Center is a valuable resource. It provides guidance and solutions for common verification problems.
Successfully verifying your WordPress site on Pinterest is a significant achievement in your Pinterest marketing journey.
It not only validates the authenticity of your site but also unlocks a suite of features and analytics, setting the stage for a robust Pinterest presence.
Remember, this verification is the bridge between your content and a vast audience eager to discover, engage, and share what you have to offer.
With your site now verified, you’re ready to explore the full potential of Pinterest and make your mark in the world of Pinterest marketing.
How to Verify WordPress Sites with Third-Party Services
Here, we are going to explore how to verify WordPress sites with two third-party services called Google Search Console and RankMath. Let’s get into it.
1. Google Search Console
Verifying your WordPress site with third-party services like Google Search Console is a vital step in understanding your site’s performance and making it more visible to your audience.
Think of it as showing your ID at the entrance of an exclusive club—once you’re verified, you’re in and can enjoy all the perks.
Let’s dive into the process of verifying your WordPress site with Google Search Console and explore the benefits it brings.
The Importance of Site Verification
- Gain Valuable Insights: Verifying your site with Google Search Console allows you access to information about your site’s performance, including how often it appears in Google Search, which search queries show your site, and how often searchers click through.
- Identify and Fix Issues: Google Search Console alerts you to any issues that might affect your website’s visibility in search results, such as crawl errors or security issues, enabling you to take corrective action.
Steps to Verify Your WordPress Site with Google Search Console
- Access Google Search Console: Start by visiting Google Search Console. If you don’t already have an account, you’ll need to use a Google account to sign up.
- Add Your Property: Once logged in, add your WordPress site as a new property. Google refers to websites as ‘properties,’ so when you’re asked to add a property, you’re simply adding your website’s URL.
- Choose a Verification Method: Google offers several methods to verify your site ownership, including HTML file upload, HTML tag, domain name provider, Google Analytics, and Google Tag Manager. Choose the method that works best for you.
- HTML File Upload: Download the HTML verification file from Google and upload it to your WordPress site’s root directory.
- HTML Tag: Add the meta tag provided by Google to the <head> section of your site’s homepage.
- Domain Name Provider: Verify your site by signing in to your domain name provider (like GoDaddy or Bluehost) directly through Google Search Console.
- Google Analytics: Use your Google Analytics account to verify your site. You must have the GA code in the <head> section of your site.
- Google Tag Manager: Use your Google Tag Manager account for verification. The container snippet must be present on your site’s homepage.
- Verify Your Site: After choosing and implementing your means of verification, go back to Google Search Console and click ‘Verify.’ If the verification is successful, you’ll see a confirmation message.
Troubleshooting Common Verification Issues
If you encounter issues during the verification process:
- Double-check the Implementation: Ensure the verification code or file is correctly placed. For HTML tag methods, make sure the tag is in the <head> section of your site.
- Check for Multiple Tags: If you’re using the HTML tag method, ensure there’s only one Google site verification tag on your site.
- Clear Cache: If you’ve recently added the verification code or file, clear your site’s cache to make sure Google sees the most recent version of your site.
- Refer to Google’s Help Resources: Google Search Console provides detailed help resources and a community forum for addressing common issues.
By verifying your WordPress site with Google Search Console, you’re not just claiming your space in Google’s digital landscape; you’re accessing a suite of tools and insights that can drive your site’s growth and visibility.
Take these steps to ensure your site is verified, and harness the full potential of this powerful tool to monitor, maintain, and enhance your site’s presence in Google Search.
2. RankMath

Verifying your WordPress site with third-party SEO services like RankMath is similar to fine-tuning a high-performance engine.
RankMath, known for its comprehensive suite of SEO tools, can significantly enhance your site’s search engine optimization.
Here’s how you can verify your WordPress site with RankMath and leverage its features to optimize your site’s SEO performance.
Understanding the Benefits of RankMath Verification
- SEO Optimization: RankMath provides an array of tools to improve your site’s SEO, including on-page analysis, keyword ranking, and sitemap creation.
- User-Friendly Interface: RankMath is designed with user experience in mind, offering a straightforward setup process and an intuitive dashboard to manage your site’s SEO.
- Comprehensive Analysis: With RankMath, you get detailed insights into your site’s performance, helping you make data-driven decisions to enhance your SEO strategy.
Steps to Verify Your WordPress Site with RankMath
- Install RankMath Plugin: Begin by installing the RankMath plugin on your WordPress website. You can do this by navigating to ‘Plugins’ > ‘Add New’ in your WordPress dashboard, searching for ‘RankMath,’ and clicking ‘Install Now’.
- Activate and Setup the Plugin: After installation, click ‘Activate’. RankMath will launch a setup wizard to guide you through the configuration process. This includes connecting your WordPress site to RankMath’s servers for analysis and optimization.
- Connect to RankMath Account: To access advanced features and analytics, you’ll need to connect your RankMath plugin to your RankMath account. If you don’t have an account, you can create one during this step.
- Configure SEO Settings: RankMath’s setup wizard will prompt you to configure essential SEO settings for your site. This includes setting up titles, meta descriptions, and social media profiles.
- Verify Site Ownership: RankMath may require you to verify your site’s ownership as part of the setup. This is usually a straightforward process and may involve adding a meta tag to your site’s header or verifying ownership through Google Search Console.
Leveraging RankMath’s Features Post-Verification
- Monitor SEO Performance: Utilize RankMath’s dashboard to monitor your site’s SEO performance. Pay attention to suggestions for improvement and implement them to enhance your site’s visibility.
- Utilize On-Page SEO Analysis: RankMath provides on-page SEO analysis for your posts and pages. Make sure to follow the recommendations to optimize your content for search engines.
- Regularly Update Your SEO Strategy: SEO is an ongoing process. Regularly review RankMath’s insights and adjust your SEO strategy accordingly.
By verifying your WordPress site with RankMath, you’re unlocking a powerful ally in your quest for SEO excellence.
The insights and tools provided by RankMath can guide your SEO efforts, ensuring your site ranks well in search engine result pages and provides a stellar experience for your visitors.
Embrace RankMath’s capabilities and watch your site rise through the ranks, one optimized page at a time.
Final Note

As we round off this full guide on how to verify your WordPress site on Pinterest, you’re now provided with the knowledge to seamlessly integrate these two powerful platforms.
The journey from upload HTML file to your WordPress site to witnessing your website flourish on the Pinterest tab is a testament to your dedication to enhancing your online presence.
Remember, this verification is more than just a technical step; it’s a gateway to unlocking the full potential of your content on Pinterest.
As your verified site takes its rightful place on this visual platform, you’re setting the stage for increased traffic, deeper engagement, and a stronger connection with your audience.
So, take a moment to celebrate your new milestone in the digital world. With your WordPress site now verified on Pinterest, you’re poised to captivate, inspire, and connect with a broader community than ever before. Here’s to your success and the endless possibilities that await on Pinterest!


