Hiiiiiii! 👋 My name is Oladejo Elisha, and I’ve gone through the ups and downs (several downs) in creating a successful blog.
This makes me more than qualified to show you how to start a blog successfully from scratch and monetize it as an effective side income with huge potential to become a full-time source of income.
In the grand opera of life, each of us has unique stories to tell. Stories that, when penned down, can inspire, engage, or bring a smile to someone’s face. That’s the magic of blogging.
But what if I told you there’s more to this? What if I told you there was a shiny pot of gold waiting at the end of this rainbow?
I discovered that each day, many people are getting involved in blogging as a business. And, yes, it could be. Blogging could be fun and also for profit.
So, I created this “simple and easy to follow procedure” to help you start a blog configured like a professional and won’t take you more than 25 minutes.
Humor me for a moment. Imagine sitting at your favorite coffee shop, typing on your laptop, sipping your favorite brew while earning money. Sounds like a pipe dream? Well, let me tell you, it’s not.
But it takes a lot of hard work, a sprinkle of patience, and a dash of passion to get there.
Knowing how to start a blog is as easy as ABC (if you follow the steps I have listed below). But to keep building a blog until it’s successful is another story entirely.
Don’t worry, I have everything you need in this very comprehensive blog post.
Are you ready for this journey? Let’s buckle up and start this incredible adventure together, shall we?
Before starting this journey into blog creation, let’s look at some of the reasons you need to start a blog.
Why You Need to Start a Blog

You might wonder, “Why on earth do I need to start a blog?” It’s a fair question, one I also used to ponder. If you are not money motivated, this is a serious question you should ponder.
As I ventured into the blogosphere as a beginner, I realized that blogging is much more than just writing blog posts and hoping someone stumbles upon them.
It’s a way of connecting with people, sharing your experiences, and even making money blogging.
When I created my first WordPress blog, it felt like I was shouting into the void. But I soon realized there were people who were interested in what I had to say, were going through similar experiences, and wanted to hear my stories. The connections I built were priceless.
There’s an exhilarating feeling that comes with seeing your words and thoughts laid out in a blog post, ready to influence the world. It’s like being on a stage, an entirely yours platform, where you’re the star and the director.
And here’s the cherry on the cake: the possibility of making money blogging. I’m not talking about mere pocket change. I mean substantial income that can truly change your life.
Trust me; there’s nothing quite like the thrill of seeing that first dollar earned from your blog.
So starting a blog can be a rewarding journey if you’re looking to connect with like-minded individuals, have your voice heard, or even earn some income.
So basically, these are reasons for you to start a blog:
- Blogging helps you discover new ways to earn online
- It helps you link with other people with the same passion.
- Makes you a better thinker and writer
- Enables you to establish an online business of your passion
- and lots more…
Now let me walk you through the process of starting your own blog.
Let’s begin!

Below are the 7 Steps I will walk you through.
- Choosing a suitable blog platform
- How to select and register a domain name for your blog
- Selecting a reliable web hosting company to host your blog
- Installing WordPress to get your blog running
- Choosing and Installing Themes
- Your first post on your blog and How to monetize it
- How to promote your blog
If none of these terms makes sense to you now, don’t worry. When we are done, you will see how easy it is to start a blog.
Step 1 – Choosing a Suitable Platform for Your Blog

Choosing a suitable platform for your blog is the first crucial step in your blogging journey. It’s like picking out the perfect soil for planting a seedling; the right choice can foster growth, while a hasty decision can leave you with an unsatisfactory yield.
Back in my rookie days, when I was trying to figure out how to start a blog, I was overwhelmed with choices. There were so many platforms, each with its features, that I felt like a kid in a candy store.
But remember this: just because a platform has a million features doesn’t mean it’s the right fit for your blog.
Starting a blog today is much cheaper, easier, and faster than about ten years ago. Thanks to the developers and programmers who took it upon themselves to create diverse platforms, which allow anyone to develop content and put it online without needing to be a programmer, have any design skills, or be an online Guru.
In short, if you can read and write, punch the keyboard keys on your system, and send and receive emails, you are already a GURU enough to start your blog.
When I started my personal blog, I focused on user-friendliness, flexibility, and scalability. And that’s when I stumbled upon WordPress. It was love at first blog post! WordPress is a dynamic platform that gave me the freedom to experiment, the flexibility to grow, and the tools to build a successful blog.
WordPress is undoubtedly the best platform to be considered for starting a new blog.
Selecting WordPress for your first blog might seem daunting, but trust me, it’s simpler than you think. Once you get the hang of it, you’ll be whipping out blog posts faster than you can say “successful blog.”
So, if you’re sitting on the fence, wondering where to start, I’d say give WordPress a shot. It might just be the springboard to your blogging success story.
Let’s look at some of the reasons why you will enjoy using WordPress

- It’s Absolutely Free. How does that sound? How can one of the most content management solution systems be free? Anyway, that’s the truth. Nothing is charged using WordPress, and that makes blogging interesting.This delightful detail is one of the factors that adds that extra sprinkle of fun to the blogging journey.
- Easy To Use For Beginners: This is one of the many reasons why WordPress beats the other platforms hands down. It’s free and easy to use. There are thousands of free WordPress Themes (Site templates) and plugins that you can use to customize your blog to your desired taste.With these, it means there is no need for programming or coding to get your site running.
- Free Tool/Resources, Guide, and Community Support: Using WordPress gives you access to a lot of free material, tools, guides, and tutorials that can enhance the creation of your blog.Likewise, you can find unlimited resources on other sites that are associated with WordPress.
- WordPress Looks Cool on Mobile: WordPress beats other CMS in this area. As many people use their mobile tech to access the internet today, it’s essential to ensure your blog looks fantastic on all devices. Set up a blog in a few minutes, and your site will look great on all devices.
- WordPress has Huge Capacity: WordPress has been downloaded more than 100 million times and still counting.It has become the choice of millions of top blogs today, such as HuffPost, VOA, Forbes, and more.
So, now that you’ve had a peek into the world of WordPress, it’s time to jump right in and start creating your own blog. But first, let’s get you a shiny new domain for your blog.
Ready for step 2? Let’s roll!
Step 2 – Choosing and registering a domain name for your blog

A domain name is a URL or site address through which someone can access your blog or site.
Also, search engine crawlers make use of the domain name to crawl your blog so that it can come up on a search engine. Here are samples of domain names: Google.com and Facebook.com. My site uses oladejoelisha.com as a domain name.
Choosing and registering a domain name for your blog is like naming a child. It’s a big decision requiring a good deal of thought because, just like a first name, your domain name is a significant part of your blog’s identity. It’s the name tag on your blog’s metaphorical shirt, if you will.
Now, when it comes to picking the perfect domain name for your blog, it’s essential to consider something relevant, catchy, and memorable. It should resonate with your content, your brand, and your persona. And remember, it’s the first impression readers get of your blog, so make it count!
Choosing or selecting a domain name is not difficult but requires creativity. You have to be creative, as most of the official domain names are already owned. And it’s not possible for two people to possess the same domain name.
Once it belongs to someone, it’s gone for good except if the current owner decides to resell it or it gets expired, and the owner is not willing to renew it.
Often time, I always recommend that people start with their personal name to avoid the uphill job of creating a name.
For instance, if you are “Williams Jones,” you could register “williamsjones.com.”As my domain name is my personal name “oladejoelisha.com.
Some big shots in the world of blogging used their personal names, and they are doing great. Examples are briantracy.com, ewenchia.com, and more.
However, you can craft a domain name from a combination of two or more words that are related to your area of interest, but this may be time demanding.
The next step is registration once you’ve chosen your perfect domain name. But here’s the catch – not all domain names are free. A domain name usually costs between $15-$30 per year. Anyways, this depends on your choice of domain.
However, when you opt for a self-hosted WordPress blog, several hosting providers offer a free domain name for the first year as part of their hosting package. It’s like a welcome gift!
How to Get a Cheap Domain Name
Getting a cheap domain name for your blog can be likened to hunting for treasure at a flea market; it requires patience, smartness, and a keen eye for a good deal.
And remember, just like a piece of vintage vinyl, the value of a domain name lies in its relevance and resonance with your blog niche, not its price tag.
When searching for a cheap domain name, consider various hosting packages. Many blog hosting companies, especially those that support self-hosted WordPress blogs, offer free domain names for the first year when you sign up for their hosting services. It’s like a two-for-one deal at your favorite pizza place!
It’s definitely worth scouring the web for the best deals. If the freebies don’t catch your eye, there are also domain name registrars that offer domain names at discounted prices, particularly for new customers. Just make sure the domain name registrar is reputable and reliable before making a purchase.
Domain registration is pretty straightforward, and anyone can do it. However, the only challenge involved is, getting a domain that hasn’t been registered. But if you follow my recommendation by making use of your personal name, you can quickly overcome this hurdle. However, this should stop you from crafting a unique name if you don’t want to use your personal name.
As I said earlier, on average, a domain could cost around $15 registration for one year. But, there is a company from where I get a domain name registered for as low as $1.99 per year with FREE WHOISGUARD and PositiveSSL (HTTPS) for one year.
As you can see, my blog is registered with HTTPS, which is high-level security that helps to prevent my blog from hackers and makes it safe for my visitors to browse my blog with confidence. It has a 128/256-bit encryption level, 99.3% browser compatibility, and a FREE static Site Seal.
WHOISGUARD helps to keep your identity as the owner of the domain private, thereby preventing Spammers and Scammers from getting your real identity online. You get total anonymity and privacy of your most important info.
WHOISGUARD costs around $10 per year and while PositiveSSL(HTTPS) costs over $20 per year. You get all for free when you register your domain with Namecheap.com.
How to Choose a Great Domain Name and the Right Extension.

Choosing a great domain name is like picking out a superhero costume – it must be eye-catching, memorable, and representative of your unique character. And let’s not forget the cape, or in this case, the right domain extension.
Your domain name should be a mirror reflection of your blog niche, and ideally, it should also include relevant keywords. This is a sneaky little trick to boost your blog’s search engine optimization (SEO), making it easier for your audience to find you in the vast world of the internet.
And who doesn’t love a good game of hide and seek, especially when you’re the prize?
So, imagine your domain name is like the title of your biography. It should capture your essence, your story, and your purpose. Avoid complicated words or phrases that can confuse your readers or make it difficult for them to remember. Simplicity is key here.
Now, onto the right domain extension. When you’re setting up a self-hosted WordPress blog, .com is generally the go-to domain extension. Why, you ask? It’s widely recognized, easily remembered, and typically preferred for blog hosting. Think of it as the cherry on top of your domain name sundae.
However, don’t feel boxed in; other domain extensions are available, like .net, .org, .blog, and many others. These can be suitable alternatives, especially if your chosen .com domain name is already taken. The extension should complement your domain name and fit well with the brand image you want to portray.
At this point, I will like to make my opinion clear about choosing an extension. I don’t believe domain extension has any negative impact on a domain name. Though a lot of bloggers prefer .com, .org, .net, and .info extensions, I’m of the opinion that any extension can be used as long as it suits your purpose.
So, feel free to pick any TLD of your choice when registering your domain name.
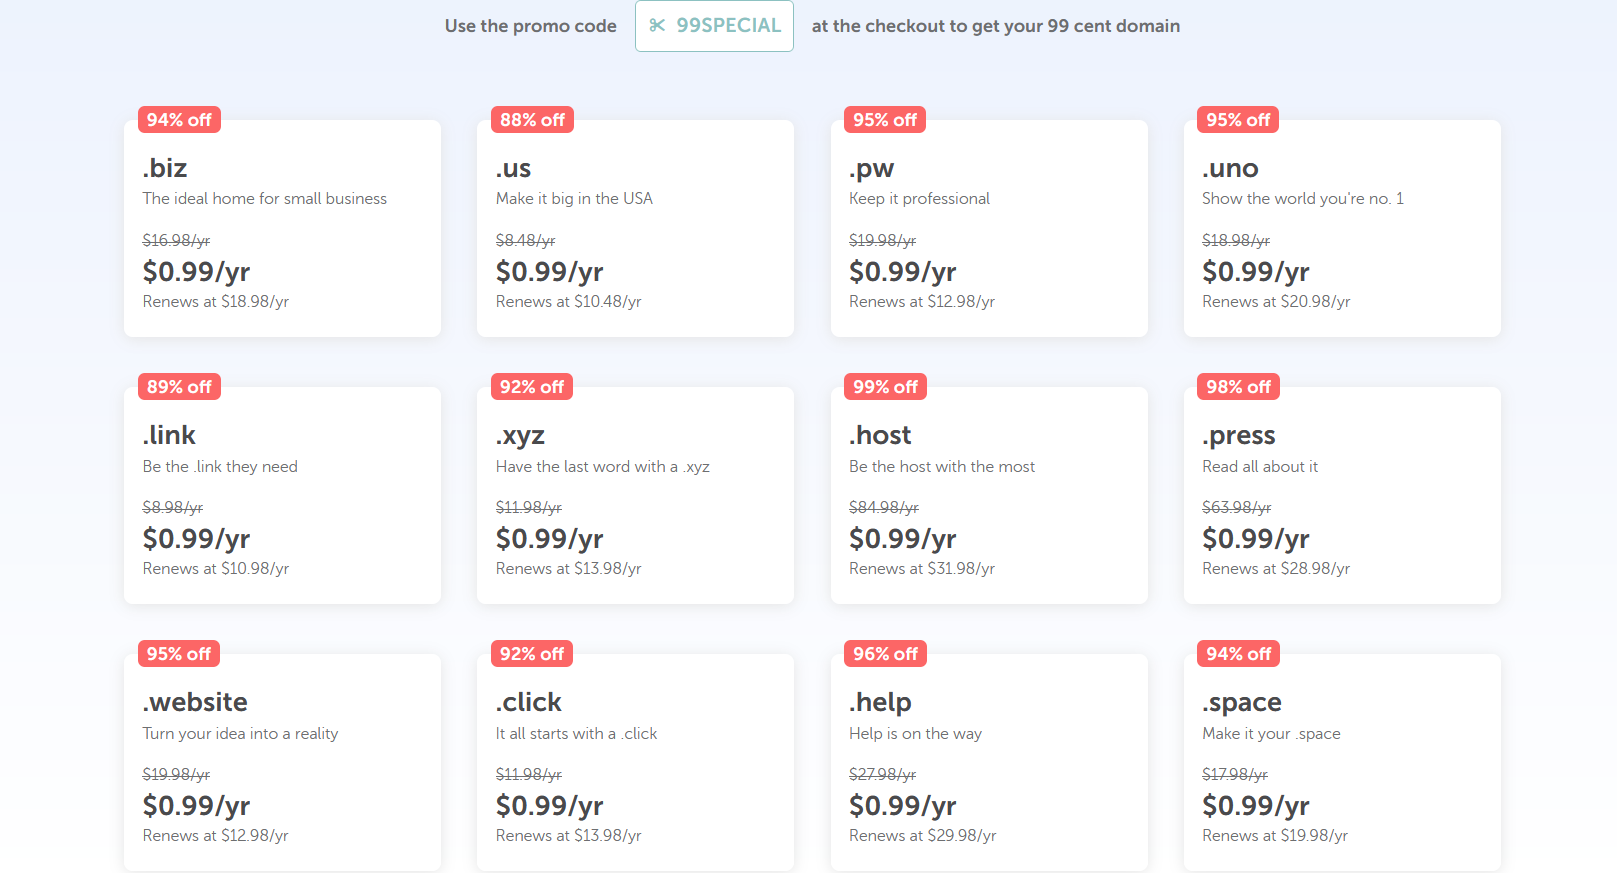
Namecheap will give you a list of available extensions with different registration fees when you search for your domain name, as shown below. Make your choice according to your budget.
With all said, here are a few points to consider when choosing a domain name:
- Make sure is short and simple
- Choose a name you can easily remember
- Avoid using any trademark names
- Preferably, use your personal name if it is available.
Ok. Head on to Namecheap now and register your domain name as it will be required in the next step.
Click Here to use my coupon code to buy as low as 99 cents.
Step 3 – Choose A Web Hosting Company To Host Your Site

If you’ve decided to go with WordPress as your blogging platform and you’ve probably registered your domain name by now, you are on the right track. Let’s keep putting the pieces together. It won’t be long before we are done with the whole stuff.
Choosing a web hosting company to host your site is like selecting the right home for your beloved pet; it must be safe, secure, and comfortable.
A hosting company provides you with a server where your site is hosted and can be accessed by visitors through your domain name from any part of the world. Hosting your blog is an essential factor that cannot be ignored.
In the case of your WordPress blog, you want a web hosting plan that offers reliability, excellent performance, and top-notch customer support.
There’s a banquet of web hosting companies to choose from, each offering various features and benefits. The options can be dizzying, from shared hosting for beginners to dedicated and cloud hosting for the more advanced.
But don’t let that scare you. Take a deep breath, grab a cup of coffee, and let’s navigate this together.
In my journey, I found Bluehost to be a reliable hosting provider. Its performance has been consistently top-tier, and its customer service has been my knight in shining armor on more than one occasion. Also, Bluehost offers specific hosting plans for WordPress blogs, which is a huge plus.
However, this isn’t a one-size-fits-all solution. You need to consider your specific needs, your budget, and your technical comfort level when choosing a hosting provider. Take your time, do your research, and consider all your options.
But if you are interested in picking Bluehost as your web host, I will advise you to go ahead and do the following! The reason is that it will help you to get along quickly.
If you aren’t, feel free to skip this section and go straight to ‘Choosing a Web Host.’
1 – Setup Your Blog with BLUEHOST (click here, and it will open in a new window)
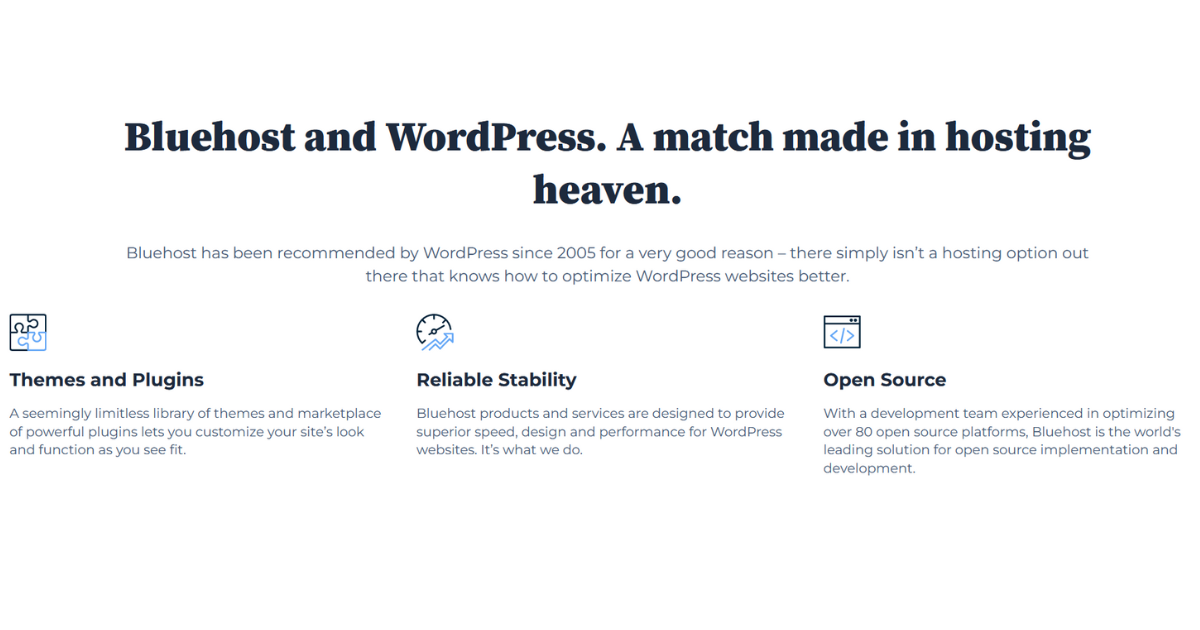
Go to the Bluehost page and find their web hosting plans. Just scroll down, and you’ll find it. You can’t miss it.
2 – Choose your Bluehost hosting plan.
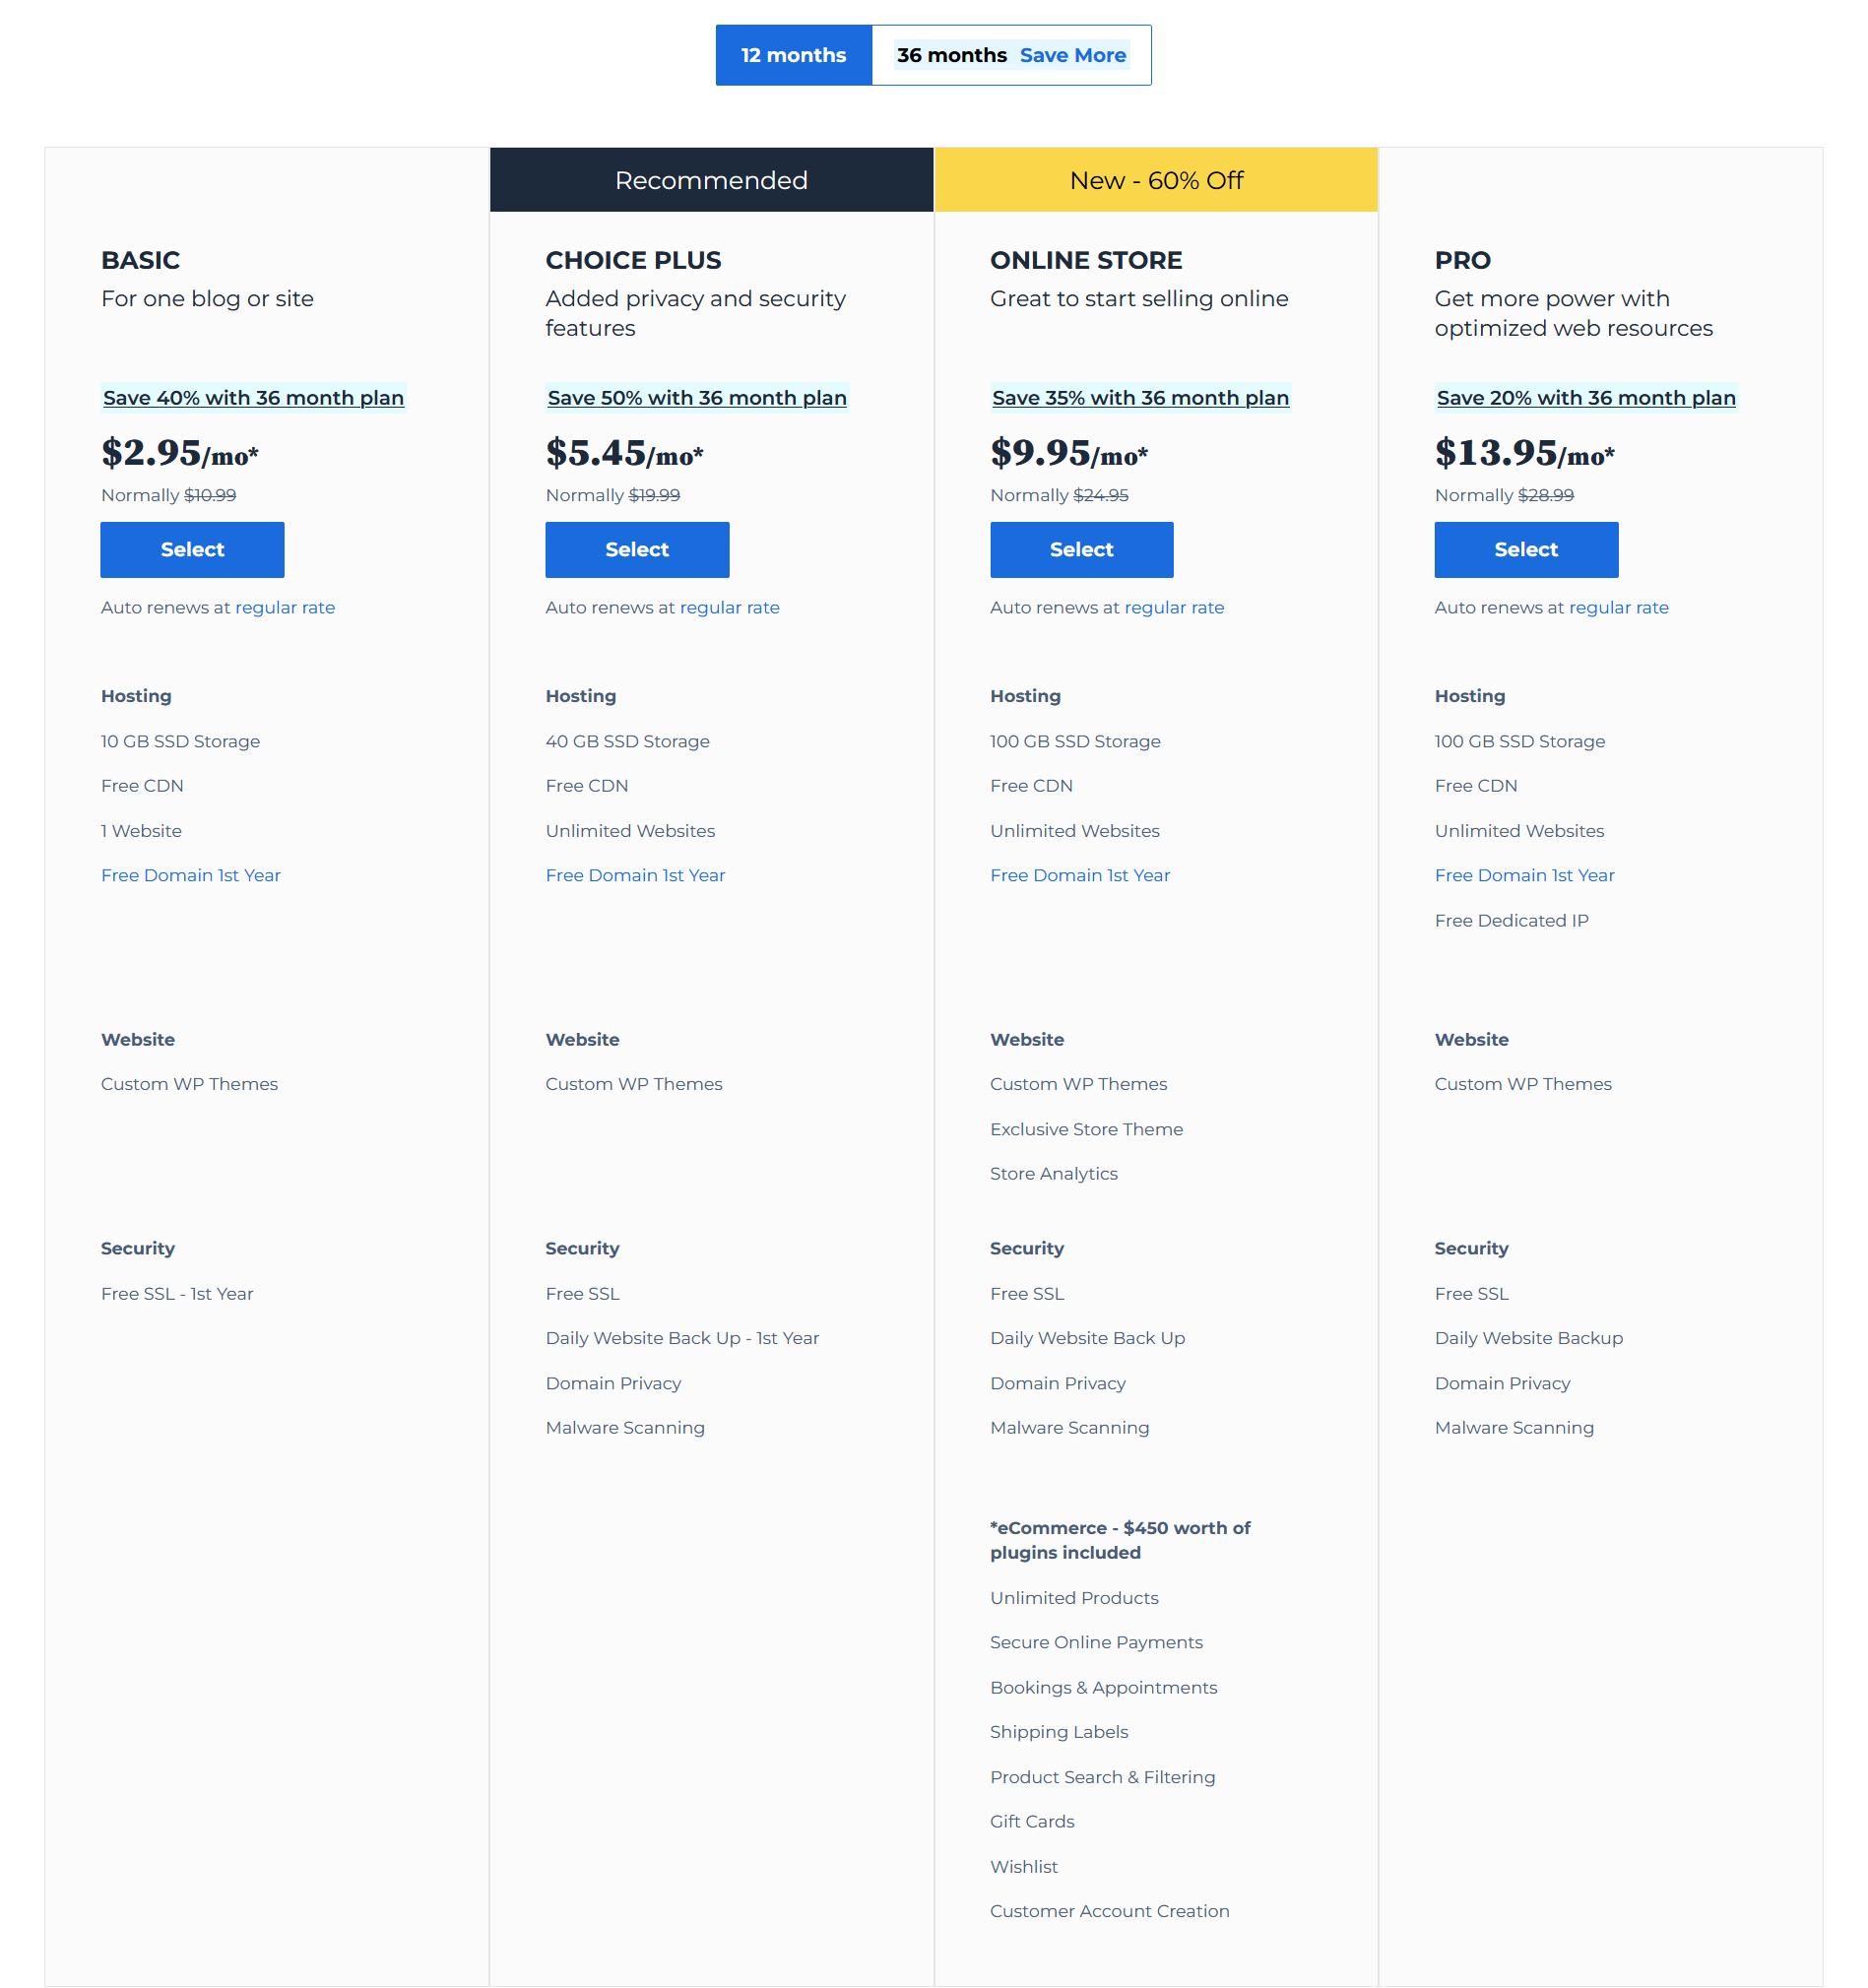
Bluehost offers a variety of hosting plans, each tailored to cater to different needs and budgets. They have four primary shared hosting plans: Basic, Plus, Choice Plus, and Pro.
The Basic plan is perfect if you’re just starting out, much like I was a few years ago. It allows you to host one website and offers 50GB of SSD storage. But what I love most about this plan is that it gives you five email accounts, which is a boon for someone just starting to establish their digital presence.
Then comes the Plus plan. It’s a step up and removes the limitations on the number of websites you can host and the amount of storage. I remember upgrading to this plan when my second blog was in the works, and it was as smooth as butter!
Next in line is the Choice Plus plan. Now this one is a game-changer, folks. It offers everything from the Plus plan but with added protection and backup features. I can’t stress enough how important this became for me as my website grew.
And finally, there’s the Pro plan. This is for you if your website has a high volume of traffic. It offers all the benefits of the Choice Plus plan, but with a higher performance capacity and additional security features.
You see, what’s fantastic about Bluehost is its flexibility. As my website grew and my needs evolved, I was able to scale my hosting plan accordingly.
Remember, choosing the right plan is all about understanding your needs, estimating your traffic, and balancing your budget.
Now, armed with this knowledge, you’re all set to pick the perfect home for your WordPress blog. Let’s forge ahead!
3 – Choose a domain name.
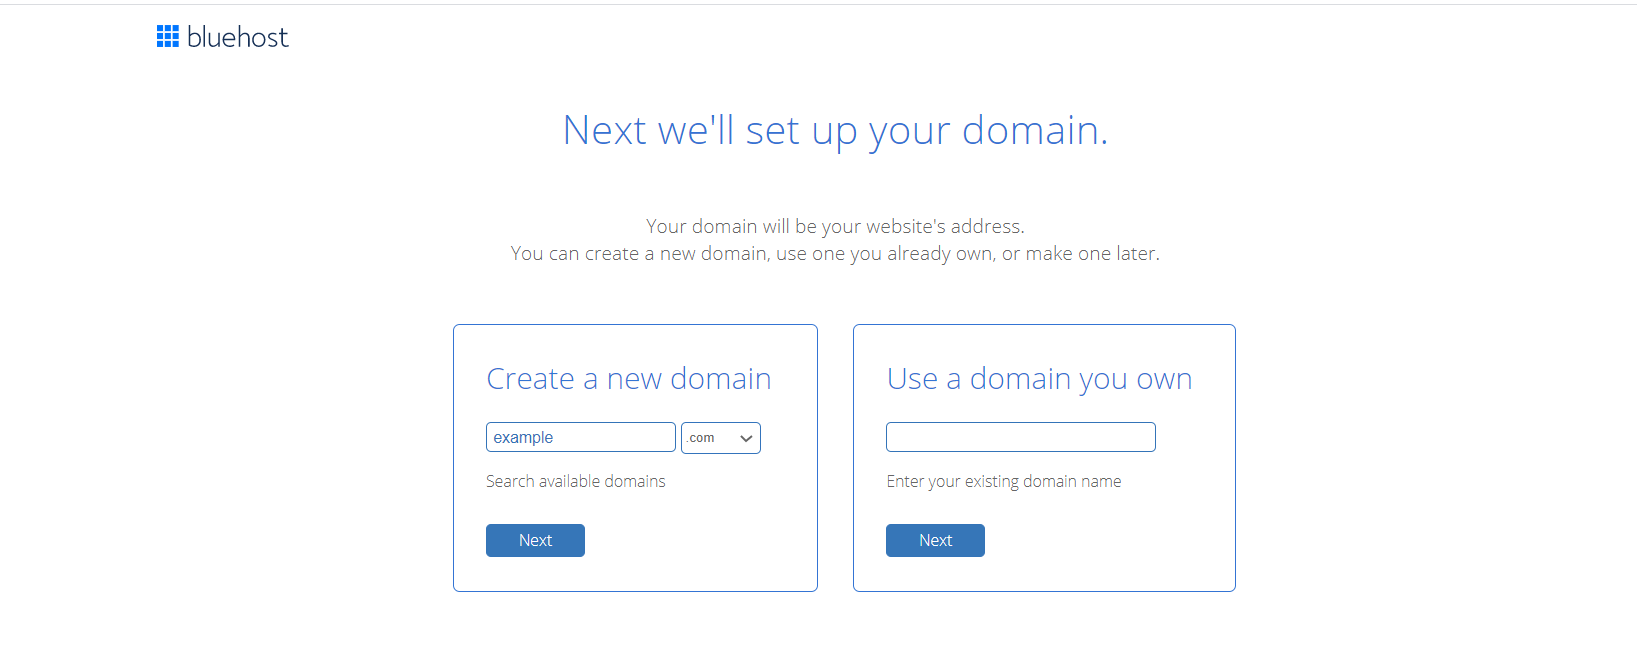
If you have your own domain, pick the second option. If not, you have to register a new domain.
4 – review and complete your order.
Now, we’re ready to embark on the third and final step – setting up your account.
Here, you’ll be filling out your personal details, entering your payment information (don’t worry, PayPal is an option), and selecting your preferred hosting options.
Let’s break this down into manageable steps for you. Follow along with this step-by-step guide, and we’ll have your account set up in no time. Ready to cross the finish line? Let’s get to it!
Alright, this next part is going to feel as familiar as making your morning cup of joe; it involves entering your email, password, first and last name, country, phone number, and all that jazz.
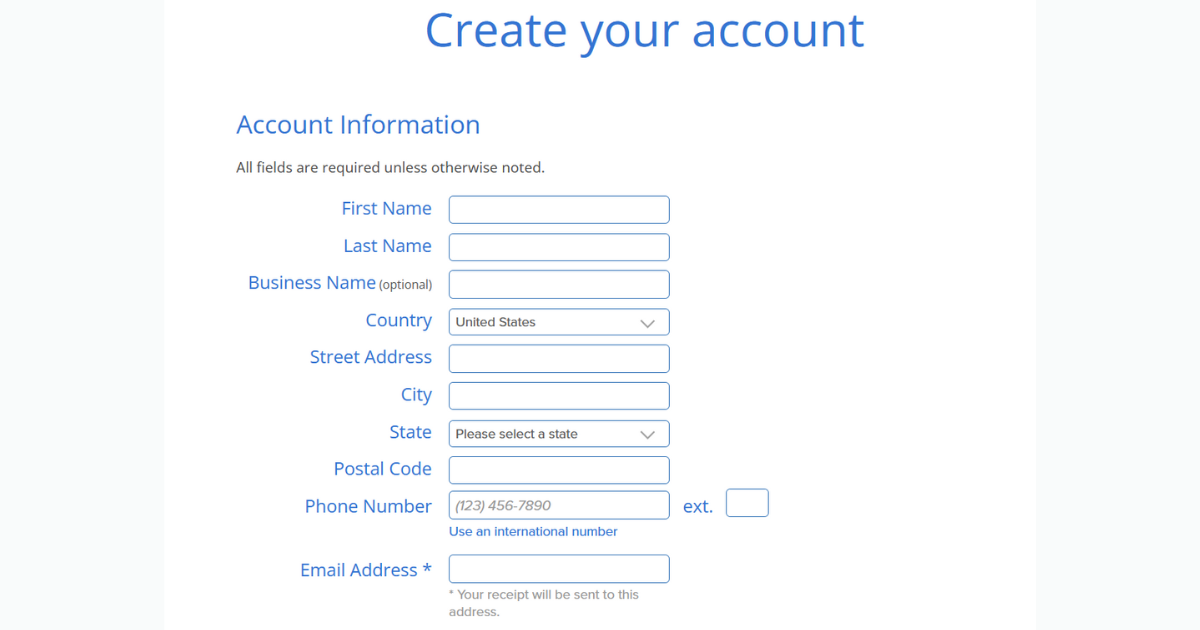
Following this, you’ll need to hand over your credit card details to Bluehost (they accept Visa and MasterCard).
Now, if you’re wondering, “Can I pay with PayPal?” – I’m here to tell you, yes; indeed you can!
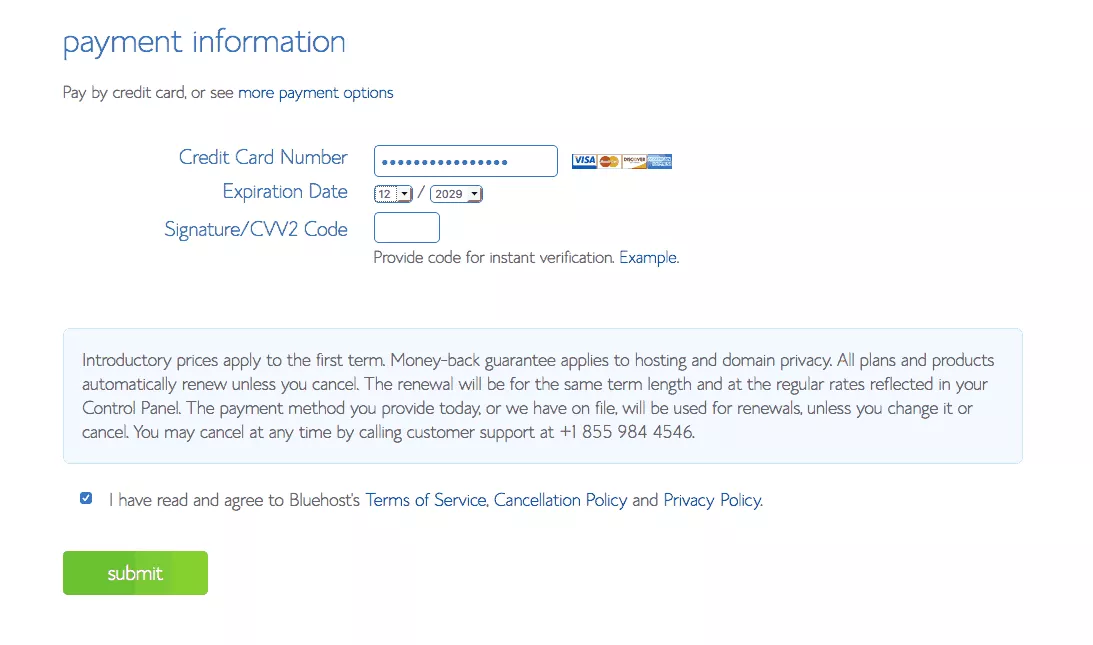
I actually used PayPal for my hosting payment, and it was as smooth as butter on toast.
If you want to go down this route, all you need to do is skip the payment details section and have a quick chat with Bluehost’s Sales Team.
You’ll find them ever ready to help through the Live Chat button, conveniently located at the top of the site in the main navigation. Easy peasy, right? Let’s keep going!
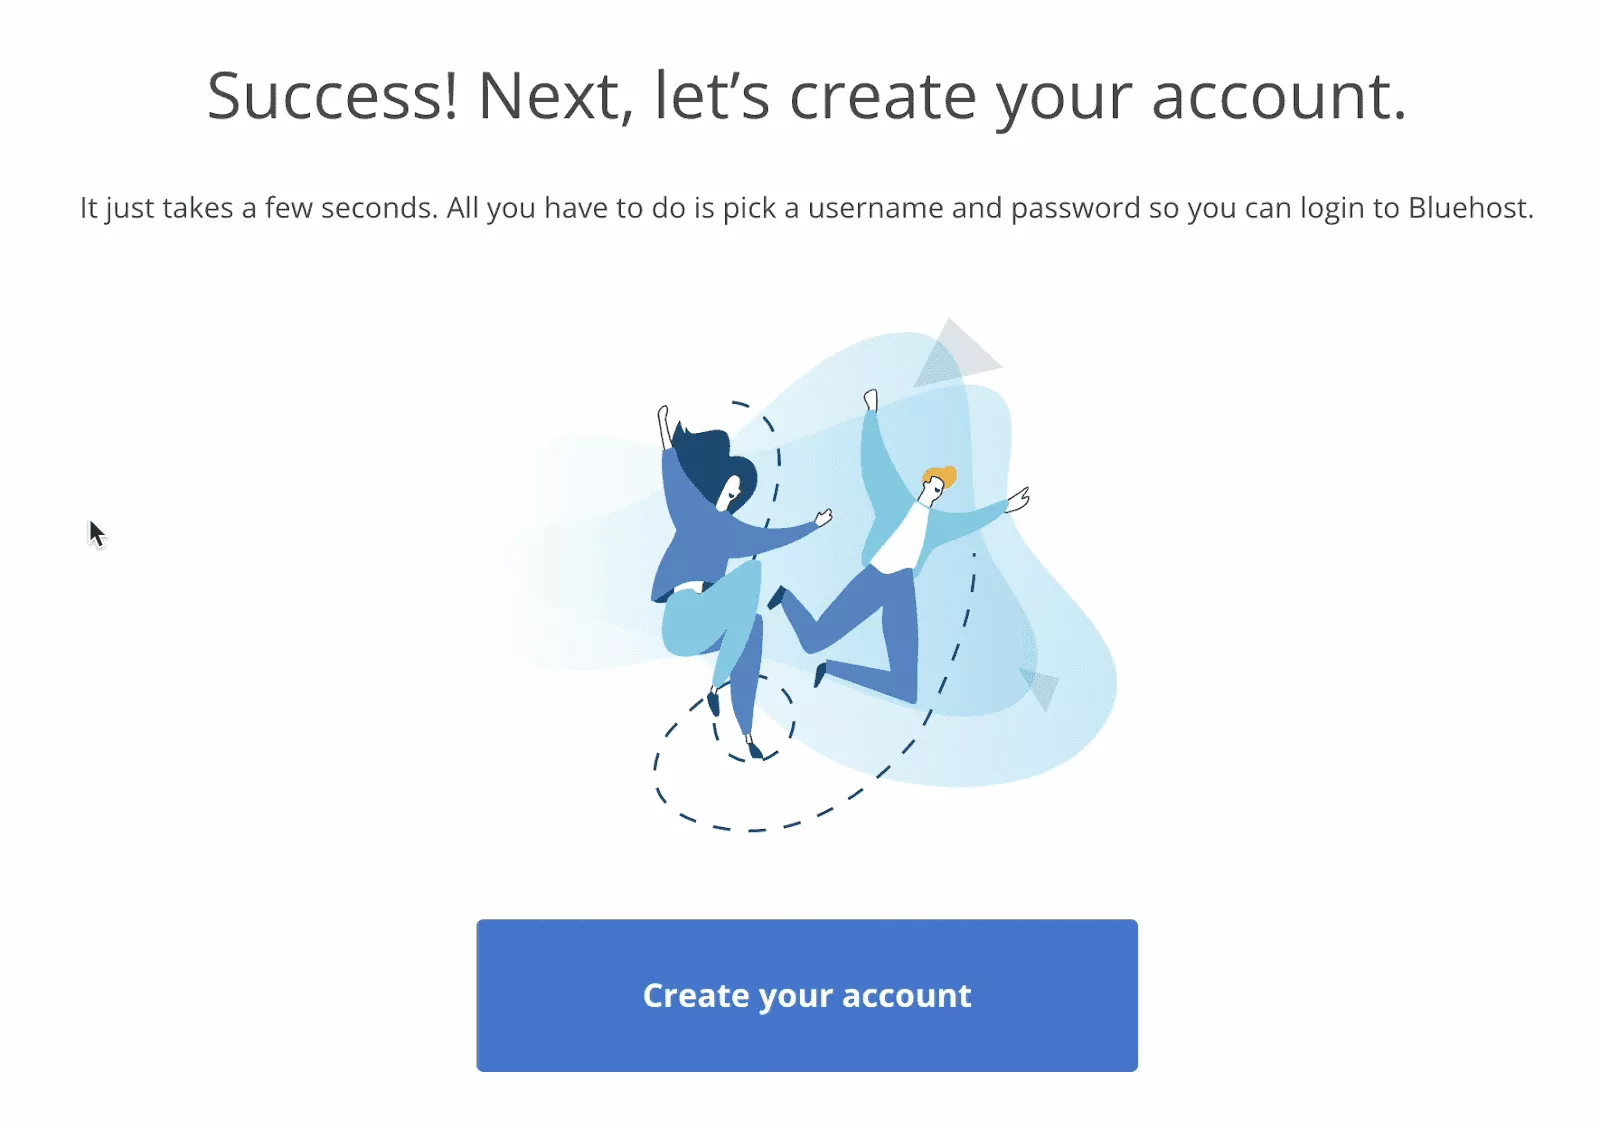
5 – fill the information and VoIla! you now have a bluehost account.
Congratulations! You’ve successfully signed up with Bluehost. Now, keep an eye on your inbox. You’ll be receiving a couple of emails – one confirming your order and another one with the keys to your digital kingdom, the login details to your Bluehost Customer Area.
You’re making great strides. Let’s keep this momentum going!
Choosing A Web Host

Choosing a web host is like picking out a new home for your blog. It’s where your blog will live and thrive, and it’s a decision that will directly impact your success in money blogging.
When selecting a blog hosting provider, there are several factors to consider. You want a reliable host that offers excellent performance and customer service and fits within your budget.
While there are various options out there, you need to find one that aligns with your goals and the specific needs of your WordPress blog.
Shared hosting might be a suitable option if you’re starting out. It’s typically more affordable and can handle the traffic levels of a new blog. As your blog grows and attracts more traffic, you may need to upgrade to a VPS or even a dedicated hosting plan.
Remember that your chosen hosting provider also impacts your site’s speed and uptime, which are crucial for maintaining a positive user experience and achieving higher rankings on search engines.
Choosing the right web host isn’t always easy, but it’s worth spending the time to get it right. After all, a successful blog is built on a sturdy blogging platform, and a good web host is a big part of that foundation. So buckle up, and let’s delve into the options available to you.
Free Hosting Company

Let’s talk about free hosting companies. Yes, you heard that right – free. The thought of hosting your WordPress blog at no cost can seem like a dream come true, especially when starting your money blogging journey. However, it’s important to tread cautiously and understand the implications.
The hosting company you select is of great importance. Never make such a mistake of going for a free hosting service, no matter how low your budget is and how desperate you are to get started. If you do, then be ready for the worst.
As the saying goes, “Nothing of lasting results comes with a free offer.” Whatever is offered for free comes with a hidden agenda.
True, free blog hosting platforms can be a great place to dip your toes into the blogging world without any financial commitment. They offer basic features that allow you to create and publish content online. But remember the age-old saying, “You get what you pay for.”
Often, these free platforms come with limitations. These can range from monetization and customization restrictions to a lack of control over your content. Moreover, they typically don’t offer the same level of customer service or performance as paid options. And if you’re serious about creating a successful WordPress blog, these are factors that could put a speed bump in your path to success.
Many people go with free hosts with the purpose of having a good experience. No, it does not work that way. Some of the free hosting servers are always down. Of course, what do you expect from a free service? No customer support, no technical support, no uptime guaranteed.
So, while a free hosting company might seem attractive initially, it’s essential to think long-term. Consider your goals, your ambition, and your vision for your blog. If you’re aiming to create a professional, money-making blog, investing in a reliable, paid blog hosting platform might be the smarter move.
Reliable, Paid Hosting company.

Now, let’s shift our focus to paid hosting companies. Yes, there’s a price tag attached, but the old adage, “You get what you pay for,” holds especially true here.
Paid blog hosting is like securing a prime piece of real estate for your personal blog. It’s a foundation that allows you to build, grow, and thrive in the world of money blogging.
The benefits are bountiful and often well worth the investment.
With a paid hosting company, you get the autonomy to customize your site to your heart’s content, the freedom to monetize your blog in a variety of ways and control over your content. But that’s not all. You also gain access to enhanced features and tools that can significantly improve your blog’s performance and security.
Another huge plus is customer support. Running into a technical glitch or need some guidance? Paid hosting providers typically offer robust customer support to assist you whenever you hit a road bump.
The added control, features, and support that come with a paid hosting platform can drastically improve your WordPress blog’s performance and your user’s experience. All of this contributes to the growth and success of your money blogging journey.
While it’s an investment, choosing a paid hosting company often pays dividends in the long run and can be a stepping stone toward achieving your blogging goals.
It’s better your foundation is strong since you are starting out. Therefore, is of great importance you go with a reliable service provider, and I recommend Bluehost.
Now, I’m cautious when it comes to recommending a service because I know how this can influence your choice.
However, my recommendation is not biased. Instead, it’s my opinion based on
- Personal experience as a user.
- In-depth online and offline research.
- Move of the wave.
Currently, Bluehost is one of the best hosting companies and the #1 WordPress optimization company in the world.
Don’t take my word for it. Take the word of the over 2.8m domains subscribed to them.
Still not impressed? Go online, do some research, and you, too, can find out through search engines that Bluehost isn’t one to play with.
Below are a few of my reasons for choosing Bluehost:
Some of My Reasons For Choosing bluehost?
I’ve used many host companies, and I prefer Bluehost to them all because they are extremely fast and exceptional in reliability with unbeatable customer support services through different channels.
My 11 Unbiased Reasons For Choosing bluehost.
These are based on my personal experiences, and I promise there’s no sugarcoating. It’s all genuine love for this fantastic service. So, let’s dive right into it:
- Ease of use: Even if you’re not a tech wizard, Bluehost’s interface is super easy to navigate.
- Affordability: They offer plans to fit every budget without compromising on quality.
- Customer Support: They have an excellent 24/7 customer service that has saved me more times than I can count.
- One-Click WordPress Installation: This feature made setting up my blog a breeze.
- Uptime: They guarantee a 99.99% uptime, and in all my years with them, they’ve never let me down.
- Unmetered bandwidth: No need to worry about traffic surges affecting the performance of your site.
- Security: Their advanced security features have always kept my site safe.
- Free domain for the first year: This was a pleasant surprise when I first signed up!
- Officially recommended by WordPress: If it’s good enough for WordPress, it’s good enough for me.
- Scalability: As I mentioned earlier, their variety of plans made it easy for me to scale as my blog grew.
- 30-Day Money-Back Guarantee: This gave me the peace of mind to try them out without any risk.
Read my complete review on Bluehost here.
Use this link to set up your host right now and get a 67% discount on your hosting, making you spend less.
Because Bluehost is really superb, they are usually a little more expensive than most other hosts. Fortunately for you, I was able to secure a considerable discount for people who use this guide.
If you follow any of the links in this article to Bluehost, you will get a 60% discount on your hosting. When it’s activated, you should see $2.95/mo.
Step-By-Step Process To Set Up Your Blog On bluehost.
Ready to start a blog with Bluehost? Follow the four steps I listed above.
Step 4 – Installing WordPress Blogging Platform.

Getting started with installing the WordPress blogging platform on Bluehost is as exciting as it gets. It’s like moving into your new home and putting up the first piece of furniture. But don’t worry; it’s not going to involve heavy lifting. With just a few clicks, your blog platform will be set up and ready to go.
WordPress is a fantastic content management system beloved by millions of bloggers worldwide. It’s user-friendly, highly customizable, and offers a plethora of powerful features through various plugins.
Now, let’s talk about how easy Bluehost makes it to install WordPress. In fact, you can automatically install WordPress right from ‘my sites’ or straight from ‘Marketplace.’
You can either install it yourself or contact Bluehost Technical Support to get it done for you. In either way, both processes are pretty easy. I will show you how to use both.
Once the installation is complete, it’s time to make your blog your own. This is where the real fun begins! You can choose from various WordPress themes to give your blog its unique look and feel. Additionally, you can install WordPress plugins to add functionality and features to your blog.
In just a few clicks, your WordPress blog will be set up on Bluehost, ready to start blogging. It’s that simple and exciting. Now, let’s roll up our sleeves and dive right into the process.
Installing WordPress with Bluehost could not be any easier. Ready to install WordPress on your website? Here’s how using the Marketplace:
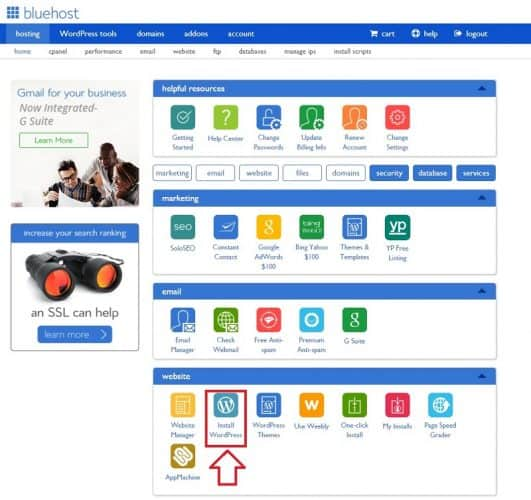
- First off, log into your Bluehost cPanel account. It’s the control room for everything.
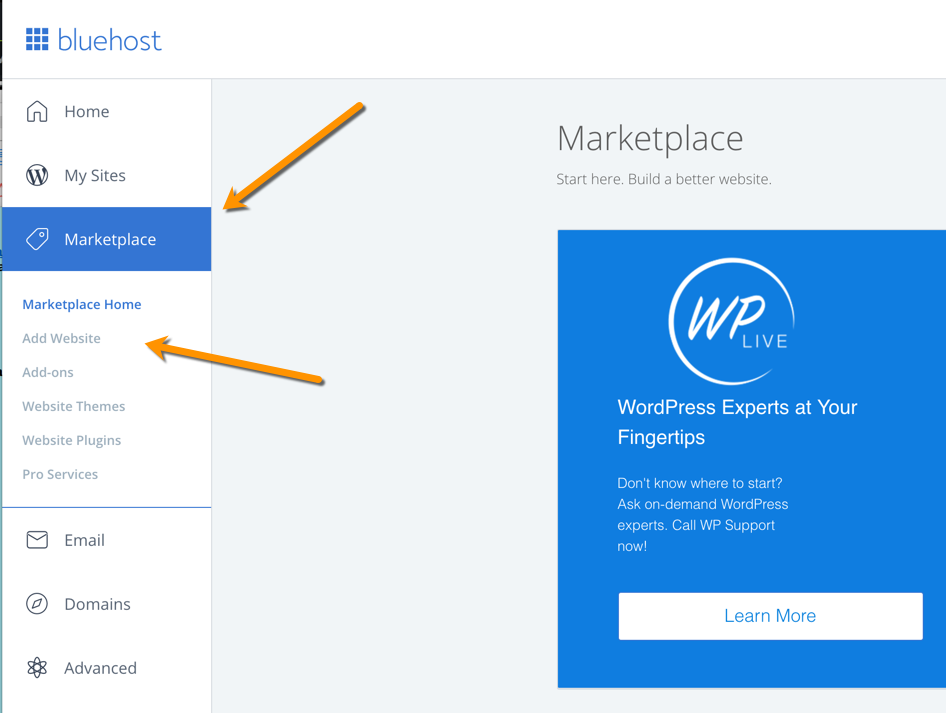
- In the Website section, you’ll find an option called ‘Install WordPress.’ Click on that.
- There’ll be an ‘Install’ button staring right back at you. Don’t hesitate, just click!.
- There’s a field next to the domain where you can input a subfolder name like ‘blog.’ But if you want your main page to be the blog, just leave it empty.
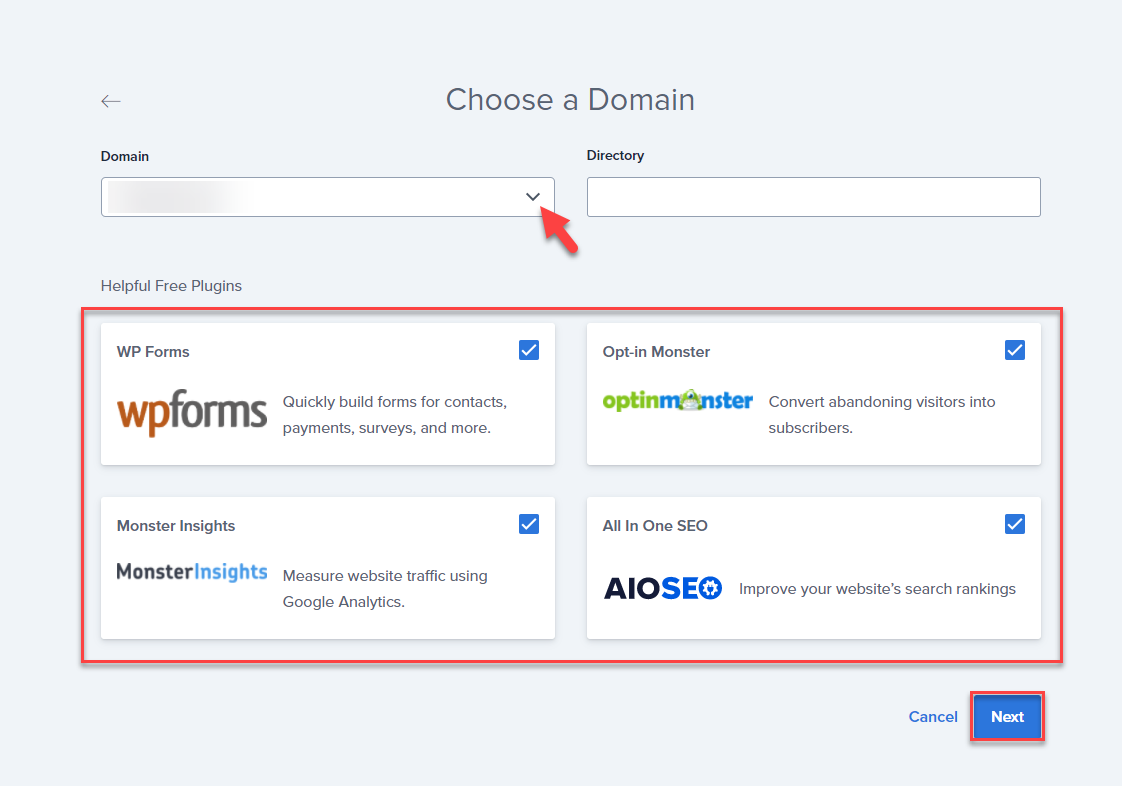
- There’s an option to tweak the email address, username, and password for your new WordPress installation. Just hit ‘advanced options,’ and you can adjust those settings as per your preference.
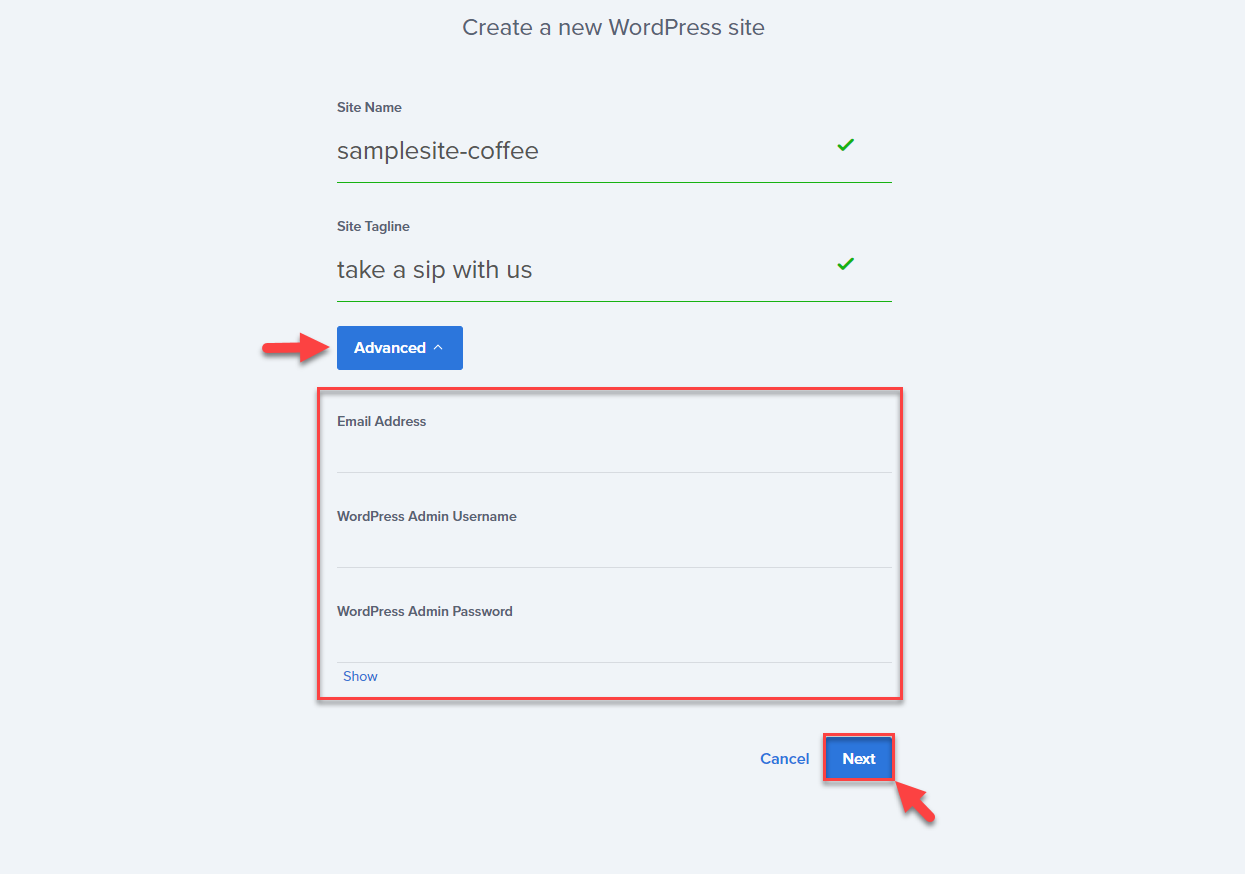
- Don’t forget to read through the license and service agreements. I know, it’s not the most fun part, but it’s crucial. Once done, check those little boxes.
- Finally, the ‘Install Now’ button will take you to the finish line. And voila! You’re done.
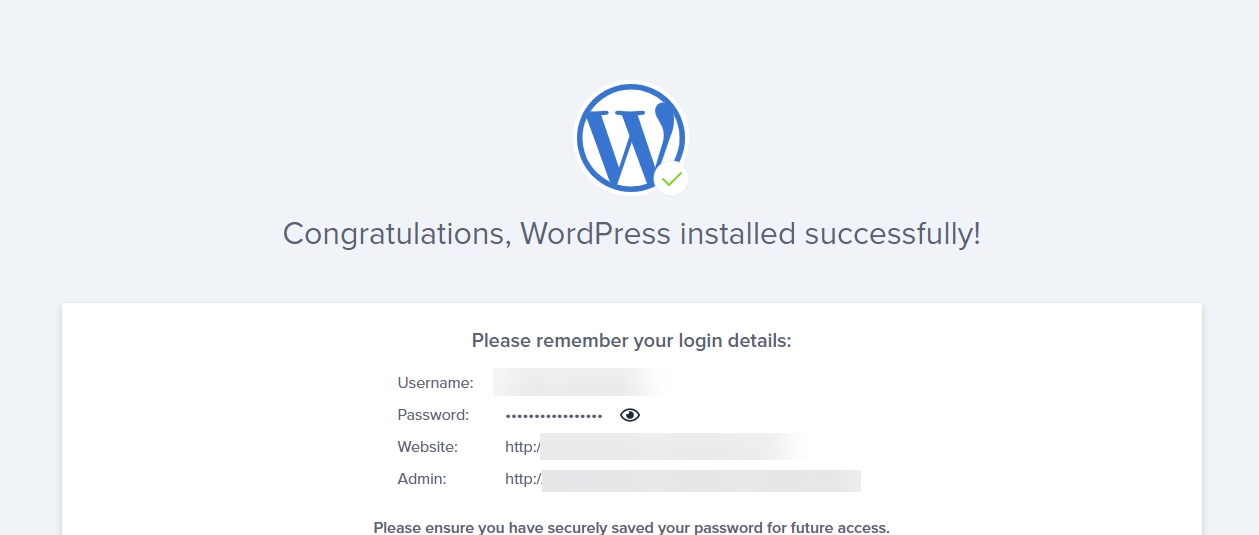
Alternatively, you can install WordPress directly from your My Sites by following these steps:
- First things first, sign in to your Bluehost Hosting account.
- Once you’re in, you’ll see a side menu on the left. Look for the ‘My Sites’ tab and click on it.
- Here comes the exciting part. Hit the ‘Create Site’ button.
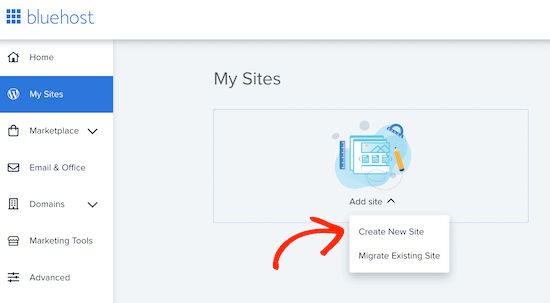
- A couple of fields will pop up asking for your ‘Site Name’ and ‘Site Tagline.’ Fill those in with your chosen details.
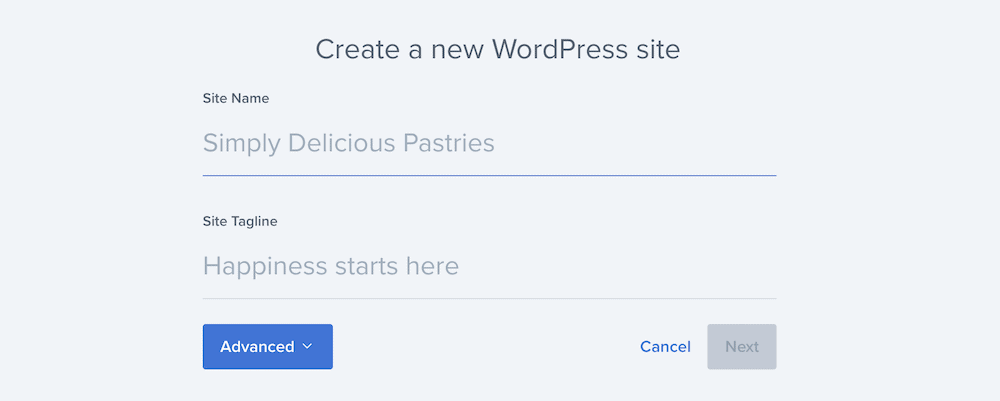
- Then, it’s as simple as clicking ‘Next.’
- A drop-down list will appear, asking you to select the domain you’d like to install to. Go ahead and make your selection.
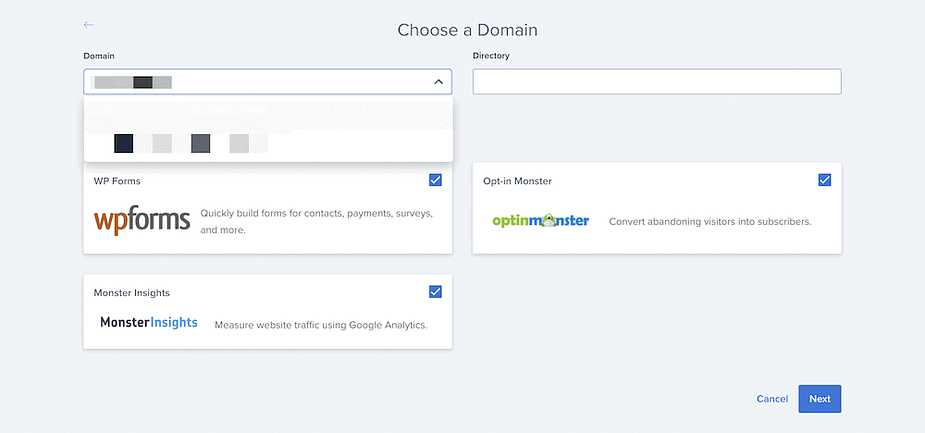
- Finally, you’ll need to choose the directory for the installation. Once you’ve done that, click ‘Next.’
Step 5 – Choosing and Installing Themes

Choosing and installing a theme is like picking the perfect outfit for your blog. It’s a big part of your blog’s personality and is crucial in attracting and retaining readers.
After all, we’re often told not to judge a book by its cover, but let’s be honest, a well-dressed blog makes a fantastic first impression.
When you’re ready to start a blog, one of the first decisions you’ll need to make is choosing a theme that aligns with your blog’s niche.
Your blog design should reflect the content you’re planning to share. Choosing a blog theme that resonates with your audience and is easy to navigate is important. After all, you want your readers to stay and explore, not hit the back button faster than a hiccup.
Once you’ve chosen your perfect theme, installing it on your WordPress site is a breeze. It’s like adding a new coat of paint but without the mess.
Just navigate to the ‘Appearance’ section in your WordPress dashboard, click on ‘Themes,’ and then ‘Add New.’
From here, you can search the WordPress theme directory, preview different options, and once you’ve found the one you love, simply click ‘Install’ and then ‘Activate.’
With your theme installed, you’re one step closer to publishing your first blog post and officially starting a blog. Your chosen theme should reflect your blog’s niche beautifully then you know your site’s design is all set.
How to Pick the Best WordPress Theme for your site

As you prepare to start a blog, choosing the suitable WordPress theme for your site is like finding the perfect outfit for a first date – it’s about making a great first impression, standing out, and resonating with your audience. But with a myriad of free WordPress themes available, how do you pick the best one for your blog’s niche and design?
When choosing a blog theme, consider what your readers want to feel and experience when they first land on your site. Your theme should reflect your blog’s niche, your style, and the message you want to convey.
Next, think about usability. Your readers should be able to easily navigate your site, finding the information they need without any frustration.
Look for themes that offer intuitive navigation, clean layouts, and responsive designs that adapt well to different devices.
Remember, less is often more. A simple, clean design can often have a more significant impact than a cluttered, complex one. You want your content, not just your theme, to shine.
Another tip: always check user reviews and ratings. They can provide valuable insight into a theme’s performance and support.
Lastly, take advantage of the ‘Preview’ or ‘Demo’ feature available for most themes. This lets you try before you buy (or download, in the case of free WordPress themes).
Choosing the right theme is an exciting milestone in your blogging journey. It brings you one step closer to publishing your first blog post and officially embarking on your path as a blogger. Ready to make your mark in the blogging world? Let’s press forward!
What Theme Do I Recommend For Your WordPress Blog?
Choosing the right theme for your WordPress blog is crucial, as it significantly influences your site’s appearance and functionality.
After a lot of exploration and experimenting, there’s one theme I can confidently recommend: Astra.

Astra is a powerful, flexible, lightweight theme perfect for beginners and experienced bloggers. It’s incredibly user-friendly, meaning you don’t need any coding knowledge to create a professional and appealing blog. The best part? Astra is designed with speed in mind, so it won’t slow down your site, which is a huge plus for both user experience and SEO.
The theme comes with an array of pre-built templates that cater to various blog niches, making it easy to set up and customize your blog to match your style and brand.
Plus, Astra is fully responsive, so your blog will look stunning on all devices, be it a desktop, tablet, or smartphone.
Additionally, Astra integrates seamlessly with popular page builders like Elementor and Beaver Builder, giving you more control over your site’s look and feel. And with its WooCommerce compatibility, you can even easily set up an online store if you plan to sell products or services on your blog.
One of the reasons I recommend Astra is its commitment to providing regular updates and dedicated support. It shows that they’re committed to helping their users succeed and continually strive to improve their theme.
So, Astra could be the perfect fit for your blog if you’re on the hunt for a WordPress theme that combines style, speed, and versatility. Try it, and see how it can take your blog to new heights!
Step 6 – Create your First Blog Post and Make Money Blogging

It’s time you customize your blog and make your first blog post. There is nothing so exciting than having your own blog. It’s the dream of many online visitors. Now you can write about what pleases you.
Creating your first blog post and paving the way to make money blogging is a thrilling milestone in your journey! It’s like stepping onto the stage for the first time, spotlight focused, ready to deliver a performance that’ll have your audience hooked.
Starting a blog might feel a bit overwhelming at first, but trust me, it gets easier with each new blog post. You’ll soon find that blogging can be one of the most satisfying ways to express your ideas, share your expertise, connect with a like-minded community, and yes – make money.
Here is the truth. Your blog is just one of the millions out there. So, if you intend to stand out from the crowd and be seen as an authority in your niche, then you’ve got to plan and create content that provides value to your readers.
To craft your first blog post, head over to your WordPress dashboard, and click on ‘Posts’, then ‘Add New.’ You’re in the driver’s seat, ready to start blogging.
Before you start typing away, spend some time brainstorming blog post ideas. Think about your blog topics, the issues that resonate with your target audience, the questions they’re asking, and the unique perspective you bring to the table.
It could be a how-to guide, a personal anecdote, or a thoughtful reflection on a hot topic in your blog’s niche.
Remember, your first blog post doesn’t have to be perfect. As you continue to publish new blog posts, you’ll get better, and your voice will become more confident and authentic. The goal is to get started, to go from being someone who wants to start a blog to someone who owns and operates their own blog.
But how do you make money blogging? The potential to earn from your blog pages comes from various streams – advertising, sponsored posts, affiliate marketing, and even selling your own products or services. I’ll delve deeper into these strategies in the following sections.
Practical Steps to Take To Make Money Blogging

Embarking on the blogging journey often brings one crucial question to mind: How do I make money blogging? Well, hold on to your hats, folks, because we’re about to dive into the practical steps you can take to turn your personal blog into a profitable venture.
Ensure Your Blog is Ready To Be Monetized:

The first step is to ensure your blog is ready for monetization. This means having a solid base of high-quality content, a user-friendly design, and some loyal readers.
Remember, your blog isn’t just a blog – it’s a platform for your unique voice, your ideas, and the value you bring to your audience.
If you want the process to be automated, then investing in an SEO WordPress tool like Rank Math is absolutely necessary.
Here’s the deal, Rank Math is like your friendly SEO sidekick for WordPress. It nudges you with suggestions to tweak your content, all based on the gold standard SEO practices that the pros swear by. You know, the stuff that makes Google and other search engines really love your site.
What’s more, it gives you the power to manage SEO settings that matter, control which pages strut their stuff on search results, and choose just how snazzy your website appears in search with Structured data. So, investing in Rank Math? Totally worth it!
Invest in SEO:

Next, you need to attract more traffic to your blog. This is where search engine optimization (SEO) comes in. By using SEO strategies, you can increase your blog’s visibility on search engines, attract more visitors, and potentially earn more from your monetization strategies.
Think of SEO as a magnet that pulls in potential readers who are interested in your blog topics.
Track and Understand Your Audience:

Speaking of attracting visitors, it’s crucial to track and understand your blog’s traffic. By setting up a Google Analytics account and a Google Search Console account, you can gain insights into your audience’s behavior, identify popular content, and uncover growth opportunities. It’s like having a crystal ball that tells you what your readers love!
How to Make Money Blogging

Now let’s talk about the money-making part.
Sponsored Blog Post:

Building a significant audience on your blog (or social media platforms) might take some time, but once you do, sponsored content becomes a potential source of revenue.
Sponsored blog content is essentially a partnership where a brand, company, or individual pays you to expose their content (or offer) to your audience, often referred to as a blog sponsorship.
The viability of this method is influenced heavily by the niche you’re blogging in and the level of engagement from your readers. Typically, sponsors prefer to see traffic of at least 5,000+ monthly readers. Achieving this number may require some patience and persistent effort.
When incorporating sponsored content, it’s vital to maintain authenticity and reader engagement. You can integrate the sponsored content seamlessly into your regular publishing style.
Freelancing (Pimp Your Skills):

So, you want to start earning from your blog, like, yesterday? Well, selling your services (be it blog jobs, freelance writing gigs, or any other kind of expertise you’ve got up your sleeve) is hands-down the quickest way to start raking in the dough.
Heck, I still do some freelancing myself as a way to monetize my own blog.
All you really need to snag a freelance client is a killer pitch. And guess what? Having a blog can give you a major leg up here. You’ll want to spruce up your key pages (think About, Contact, Hire Me) and show off a few examples of the kind of work you do – the same stuff you’ll be pitching to potential clients.
Don’t have any work samples yet? No worries. Whip up a few sample articles, designs, or other deliverables and host them on your own blog as if they were paid projects.
If you’ve got a skill you can sell as a service, you’re already good to go. That skill could be anything from…
- Writing (which is one of the top blogging skills to master)
- Design
- Photography
- Marketing (like content marketing, digital marketing, you name it)
- Developing (check out these WordPress developer job sites)
- Public relations
- Social media management
- Virtual assistance
- Community-building
- SEO or paid ad campaigns
- Business strategy or project management
- And so much more… because, let’s face it, any skill can be monetized!
Offer Ads Slots on Your Blog:

One of the most common ways to make money blogging is through advertisements. You can join ad networks that display ads on your blog and pay you based on the number of views or clicks they receive.
I used to rake in about $1,500 to $2,000 a month just from a few small ads spread across my blog content and tucked away in my blog sidebar. But then I decided to ditch ads to improve my page speed and explore other ways to make money.
Sure, there are loads of ad networks out there that offer pretty decent CPC (that’s the cost per click) and CPM (cost per 1,000 impressions) rates and aren’t too picky about the types of products that can advertise on your site.
Remember, how much you can earn from ads largely depends on what type of blog you run, so it’s worth researching and checking out all the top blog advertising networks in your niche.
If you’re considering giving ads a shot, some of the best networks to consider are Mediavine, Monumetric, Google AdSense, and Propeller Ads.
Depending on your niche, there could also be a few dedicated ad networks that offer better payouts than their competitors.
But let’s be real here, traditional CPC or CPM advertising doesn’t really start raking in the big bucks (as a major source of blog income) until you’re pulling in around a million or more monthly readers. So, it’s not exactly the best short-term strategy if you’re only hosting a few ads in your blog sidebar.
However, when you’re just starting out with your blog, it can be one of the simplest ways to earn a bit from your traffic without much extra work – just remember to keep your expectations in check for now.
Affiliate Marketing:

Affiliate marketing is another popular strategy, where you promote other companies’ products or services and earn a commission for any sales made through your referral affiliate link.
A vast number of leading brands offer affiliate programs, ranging from retail giants like Amazon to niche-specific entities in online education, including CreativeLive and Udemy.
After establishing a solid reader base, you can leverage this to negotiate better affiliate deals with companies whose products align with your audience’s interests.
Although fluctuations in market conditions can impact all sources of blog revenue, affiliate marketing has demonstrated remarkable sustainability as an effective monetization strategy for blogs over the past decade. Even to date, I remain proactive in exploring new affiliate programs to continuously grow my blog’s revenue.
Sell Something:

You can also create and sell your own products or services, such as ebooks, online courses, or coaching services. This strategy can be particularly profitable because it cuts out the middleman and lets you pocket the full price of your product.
You know, the thing about having a skill or an experience that others want to learn is that you can easily package it up and make it a course.
It’s like taking my blogging tips or your best cooking secrets and putting it in a format where people can pay to learn it all in one go.
And the cherry on top? You don’t need a massive audience to earn from online courses. The same rule applies if you decide to pen down an ebook and sell it to your readers.
Here’s a little nugget of wisdom: once you’ve got readers coming to your blog, make sure you get them talking. Encourage them to ask questions, offer free downloads, share some golden advice, and entice them to join your email list or get in touch directly.
The goal here is to understand their biggest challenges that align with your blog’s focus. Figure out how your unique skills, knowledge, and experience can help them. Once you’ve got a clear picture, reach out to them personally, perhaps over email, and pitch your course.
Offer them a chance to pre-order and benefit from direct coaching while you’re still putting the course together.
Remember, getting folks to part with their hard-earned cash is a surefire way to confirm you’re providing a solution to a real problem they’re facing. Plus, you get to have real people help you build and tweak your course content in real time. Now, isn’t that a win-win?
Podcast Sponsorships:

So, another excellent method to make some cash from your blog is by setting up a podcast for your readers. Think about it – your blog’s traffic and your podcast’s initial listenership could attract brands keen on reaching an audience like yours!
You could even bundle podcast ad placements with sponsored posts on your blog, making the deal even more enticing for potential sponsors.
I know, I know…starting a podcast when you’re still getting the hang of blogging might seem like a stretch. But trust me, a podcast could be as relaxed as having informal chats with other bloggers in your field. All you really need is a place to host your podcast and some good editing tools to get your show on air.
My advice? Get a few episodes under your belt and launch your show without worrying about finding sponsors right away. If folks tune in and like what they hear, they’ll subscribe and stick around.
A really cool way to reach more listeners is by being a guest on other, more established podcasts in your field. So, why not try pitching yourself as a guest on other shows?
Business Partnerships:

So, out of all the ways you could make money from your blog, one of the most intriguing and unpredictable ones has to be business partnerships. You never really know who you’ll cross paths with – it could be a future podcast guest or a potential collaborator.
The opportunities to stumble upon partnerships are basically limitless.
For me personally, having consistently blogged for over ten years has opened doors to meet some truly talented entrepreneurs.
Granted, there aren’t many straightforward ways to deliberately create these kinds of partnerships aside from building your brand and expanding your blog’s reach. Then, stay open to the creative folks and ideas that will naturally gravitate toward you as they discover your blog.
But hey, if there’s someone in your niche that you’ve been itching to work with, why not strategize a way you could bring value to their business? That could be your ticket to a fruitful collaboration.
Be Patient:

Lastly, remember that patience is key. Making money blogging isn’t a get-rich-quick scheme. It takes time to build an audience, establish trust, and start earning significant income.
But with passion, persistence, and these practical steps, you can turn your blog into a money-making machine.
So, let’s put the pedal to the metal and start blogging for profit!
List of Some Blog Niches You Can Make Money From

Diving headfirst into the world of blogging often sparks a whirlwind of questions, one of the most significant being: What should I blog about? You might have a swirling vortex of ideas, but not all blog niches are created equal, especially when it comes to making money.
So, here are some blog niches you might consider as you ponder on how to start a blog.
Personal Finance
Firstly, let’s talk about personal finance. Money talks and it talks loud in the blogging world. Whether it’s budgeting, investing, saving for retirement, or finding side hustles, people are always looking for advice on managing their finances.
Health and Wellness
Next up, health and wellness. This niche covers everything from fitness routines and healthy recipes to mental health and self-care.
Health and wellness blogs are in high demand in a world increasingly focused on well-being.
Travel Blogging
While impacted by recent global events, travel blogging still holds considerable potential. Whether it’s backpacking on a budget, luxury travel, or even armchair traveling, people love living vicariously through the experiences of others.
Technology
Technology and gaming blogs are also hot tickets. Whether you’re reviewing the latest gadgets, offering tech advice, or diving into the world of video games, there’s a considerable audience out there for this niche.
Lifestyle
Lastly, consider the DIY and home decor niche. People love making their living spaces more beautiful and personal, from upcycling furniture to giving a room a fresh coat of paint.
Entrepreneurship
This niche dips its toes into everything related to the hustle and bustle of starting and operating a business, dipping your toes into marketing waters, and carving out your own personal brand. Yes, it’s a bustling market, but if you’ve got business savvy and firsthand experience, you can offer golden nuggets of wisdom to your readers that they won’t find anywhere else.
Education
Think about all things online learning, nuggets of wisdom on how to study effectively, and a treasure trove of educational resources. With the digital age causing a surge in e-learning, there’s a growing appetite for this type of enlightening content.
Personal Development
Now, this is a niche that delves deep into the realm of self-improvement, stoking the fires of motivation and providing the tools for productivity. With a world hungry for personal growth and ways to enhance their lives, this niche has seen a steady rise in popularity.
So, there you have some profitable blog niches to consider for your new blog. Now, all that’s left is to pick a blog name, roll up your sleeves, and start a blog that can turn your passion into profit.
Step 7 – Promote Your Blog

Getting your blog out there is just as important as crafting your content.
After putting in all that effort crafting compelling content for your blog, you want to ensure it reaches as many people as possible. Here are some effective strategies for promoting your blog and getting your content in front of the right audience.
1. Leverage Social Media:

Social media platforms, like Facebook, Twitter, Instagram, LinkedIn, or even TikTok, offer excellent avenues for blog promotion. But remember, different platforms attract different demographics, so make sure to tailor your approach to each one.
For instance, on Twitter, you could engage with trending topics that align with your blog’s theme. On the other hand, Instagram is a visually-driven platform, so create appealing images that sum up your posts and use relevant hashtags to extend their reach.
LinkedIn is perfect for more professional or industry-specific content.
Don’t forget to engage with your audience on these platforms. Respond to comments, join relevant conversations, and even start a few of your own.
2. Optimize for SEO:

SEO is a game-changer in increasing your blog’s visibility. Start by researching keywords relevant to your content and use them in your blog posts, headlines, meta descriptions, and image tags.
But SEO is not just about keywords. Ensure your blog posts are comprehensive, well-structured, and provide valuable information to your readers.
This step is important because search engines love quality content!
3. Guest Blogging:

Guest blogging is a fantastic way to reach new audiences. Find other blogs in your niche that accept guest posts and pitch them with your ideas.
When you guest blog, you’ll usually get a link back to your site, introducing new readers to your content.
Similarly, inviting others to guest post on your blog can bring their followers to your site, providing you with a fresh audience.
4. Collaborate with Influencers:

Influencer collaboration can boost your blog’s visibility significantly. Partnering with an influencer in your niche allows you to tap into their established audience.
You can collaborate through joint blog posts, interviews, or social media takeovers.
Remember to choose influencers whose values align with your own, as their audience will likely share those values.
5. Email Marketing:

Email marketing remains one of the most effective promotional strategies.
Encourage your readers to subscribe to your blog and send them regular newsletters with updates, teasers of your latest posts, and any other content they might find interesting.
A well-constructed email brings readers back to your site and helps create a more personal relationship with your audience.
6. Join Online Communities:

Online communities, like Reddit, Quora, or industry-specific forums, are excellent places to promote your blog. Look for questions or discussions related to your blog content and provide insightful answers, subtly linking to your blog.
But be careful not to spam. These communities value genuine participation and can be averse to blatant self-promotion.
7. Use Paid Advertising:

Paid advertising, like Google Ads or social media ads, can boost traffic. Although it might not be the first choice for everyone due to the cost, it can be an effective way to target specific demographics or regions.
Promoting your blog is an ongoing task, but by using these strategies and finding what works best for you, your audience will grow, and engagement will increase.
More Tips on Creating and Maintaining a successful blog
How to Introduce Yourself on Your First Blog Post

When starting with your blog, an introduction is one of the best ways to connect with your readers and set the tone for what’s to come. Here’s how you can make a killer intro on your first blog post:
- Tell ’em a story: Share a personal story that ties in with your blog’s theme. This way, your readers can get a feel for who you are and where you’re coming from.
- Why you’re here: Talk about why you started a blog and what you hope to accomplish. This gives your audience an idea of your mission and what they can look forward to.
- A little about you: Give a quick rundown of your background – where you’re from, what you do, your hobbies, and anything that helps your readers get to know you better.
- What’s in store: Let your readers know what kind of content they can expect to see on your blog and how often you’ll be posting. This way, they know what they’re signing up for and can trust that you’ll deliver.
- Call to action: End your post by asking your readers to do something, like leaving a comment or following you on social media. This helps to build a community around your blog.
Remember to keep it real and stay true to yourself when writing your intro. This is your chance to make a stellar first impression, so put some time into crafting a great first post. And remember, the key to a successful blog is authenticity.
How Many Times Should You Post on Your Blog?

How many times you should update your blog depends on your goals and your specific niche. But here are a few golden rules to keep in mind:
- Stay regular: When it comes to blogging, regularity is key. It’s more beneficial to put out fresh content on a consistent schedule – whether that’s daily, weekly, or monthly – than to drop posts here and there.
- Quality > Quantity: Sure, posting often can keep your readers hooked, but at the end of the day, it’s all about quality. So, focus on delivering top-notch, well-researched, and engaging content that your readers will find useful and interesting.
- It’s all about the niche: How often you should blog can vary based on your niche. If you’re running a news blog, you might need to post several times a day.
But if you’ve got a more specialized blog, you can get away with less frequent updates. - Pick a suitable schedule: Consider your schedule and resources when deciding how often to post. It’s always better to publish fewer high-quality posts than to churn out loads of low-quality ones because you’re trying to do too much.
As a general rule of thumb, posting new content at least once a week is a good idea. This keeps your readers interested and also gives your SEO a nice little boost.
But remember, consistency and quality trump the number of posts any day. So, don’t stress about hitting a specific weekly post count. Instead, focus on delivering valuable content that your readers will love.
Cracking the Code: How to Think Up Awesome Blog Post Ideas

Coming up with fresh and interesting blog post ideas can feel like you’re trying to solve a Rubik’s Cube. But don’t worry; these handy tips and tricks should help you out:
- Get to know your audience: Think about what’s bugging your readers or the problems they might be having. Then, whip up some content that tackles these issues head-on.
- Spy on your rivals: Look at what other bloggers in your space are chatting about and see how you can give those topics your unique flair.
- Stay in the loop: Keep up with the latest news and trends in your industry, and then use your blog to share your take on the current happenings.
- Harness the power of keyword research: Tools like Google Keyword Planner or SEMrush are your best friends when spotting popular and relevant topics in your niche.
- Reuse and recycle: Got some old blog posts or social media posts gathering dust? Give them a new lease on life by transforming them into fresh blog posts.
- Share your personal journey: Don’t be shy about sharing your experiences and the life lessons you’ve picked up.
- Make lists: Lists of resources, handy tools, or helpful tips are always a hit with readers.
- Chat with the pros: Try interviewing industry experts or influencers to give your readers valuable insights and fresh perspectives.
Remember, the key to a steady flow of cool and engaging blog content is keeping an open mind and being ready to explore new ideas. So go out there and start brainstorming!
Figuring Out Your Blog’s Report Card: How to Measure Success and Track Progress

So, you want to know if your blog is smashing it out of the park or if it’s just a benchwarmer?
To really get a feel for your blog’s performance and keep track of how things are going, there’s a mix of metrics and tools you can use.
Here’s the rundown:
- Traffic Jam: Keep an eye on how many folks are dropping by your blog every month. And don’t forget to split these visitors into new and returning guests.
- Is anybody out there?: Track how your readers are interacting with your content. Are they leaving comments? Sharing your posts on social media? Spending a lot of time on your site?
- Making the conversion: You’ll also want to count how many email subscribers, leads, and sales your blog is bringing in.
- Climbing the search engine ladder: Regularly check where your blog is sitting in the search engine rankings for your target keywords.
- Building bridges with backlinks: Count the number and check the quality of the backlinks leading to your blog.
To help you keep tabs on all these metrics, tools like Google Analytics, SEMrush, Ahrefs, or Moz are just what the doctor ordered.
Using these tools, you can check how your blog’s been doing over time, track your key performance indicators, and spot any areas that might need a bit of TLC.
One more thing. Don’t be shy about setting some specific goals for your blog, like bumping up your traffic or bringing in more leads. Keep track of your progress towards these goals over time, and you can make informed decisions based on your data.
By closely monitoring your metrics and progress, you’ll be in the perfect position to keep making your blog better and better.
Making Friends with Search Engines: How to SEO-Optimize Your Blogs

If you want to get noticed on search engine results pages and have more visitors at your blog’s doorstep, optimizing your blog search engine (SEO) is the way to go.
Here’s the lowdown on making your blog more SEO-friendly:
- Key it in: Figure out what keywords and phrases your audience is using to search for content like yours. Then, make these words the star of your show – pop them into your blog titles, meta descriptions, headings, and your content.
- High quality is the best policy: Dazzle your readers with comprehensive, useful, and unique content.
- Meta descriptions matter: Write snappy meta descriptions for your blog posts that give a sneak peek of the content and include your target keywords.
- Head ’em up: Organize your info using headings (H1, H2, H3). This makes your content easier to read and search engine friendly.
- Images need love, too: Give your photos a squeeze to compress them, add alt tags, and slip in relevant keywords in the file names.
- Connect the dots with internal links: Point your readers towards other related content on your site, like older blog posts and other pages.
- Build bridges with external links: Get backlinks from trustworthy sites in your field. The more backlinks you have, the more credibility your site will have in the eyes of search engines.
- Be a social butterfly: Share your blog content on social media platforms like Twitter, Facebook, and LinkedIn.
- Speed things up: Make your website faster by using a content delivery network (CDN), compressing images, and improving server response times.
By sticking to these SEO tips, you can improve your blog’s visibility and welcome more visitors to your website.
FREE GIFT: Frequently Ask Questions by New Bloggers

Starting out in life is not quite an easy task. There are always questions to ask when it comes to doing something for the first time. Therefore, I wanted to provide some answers to a few frequently asked issues when it comes to starting a blog. Hope this helps.
1. How do I start a blog?
Starting a blog requires a few simple steps. Firstly, select a suitable platform like WordPress for your blog. Next, choose and register a domain name, which will be your blog’s address on the internet. Then, select a reliable hosting provider like Bluehost.
Install your blogging platform on your host, choose a theme that suits your blog’s niche, and then create your first blog post. With the right platform, the process can be seamless and straightforward.
2. What should I blog about?
Your blog content should align with your interests, knowledge, and experiences. Popular blog niches include personal finance, health and wellness, travel, technology, gaming, DIY and home decor, entrepreneurship, education, and personal development.
The key is to choose a niche you’re passionate about and in which you can provide valuable content to your readers.
3. How do I choose a good domain name?
A good domain name is concise, easy to remember, and indicative of your blog’s niche. Avoid complicated spelling and try to include relevant keywords.
Also, choose a suitable extension: ‘.com’ is the most popular and universally recognized, but you can also consider others like ‘.org,’ ‘.net,’ or niche-specific ones like ‘.blog.’
4. What’s the difference between free and paid hosting?
With free hosting, your blog is essentially a subdomain of the hosting company, which can limit your control and customization options.
Paid hosting, on the other hand, gives you full control over your blog, provides better technical support, and typically offers superior performance and security.
5. How can I make money from my blog?
There are several ways to monetize a blog. You can display ads on your site through platforms like Google AdSense, join affiliate marketing programs and earn commissions on sales, sell products or services directly from your blog, or generate income through sponsored posts.
6. How do I get traffic to my blog?
You can increase traffic to your blog by implementing search engine optimization techniques, promoting your blog on social media, engaging with your readers through comments and emails, and consistently producing high-quality, valuable content.
7. When will my blog start showing on the TOP search engines like Google?
Google will undoubtedly discover your site once the posts are indexed and people visit the site. However, one of the best ways to speed up the process is to get links to your blog from social sites and other relevant sites. Though the process of ranking a blog in Google is complicated, I will suggest you read more SEO tips to learn more about how the process works.
8. How often should I post on my blog?
Consistency is key in blogging. Whether you post daily, weekly, or monthly, make sure to stick to a schedule.
Regular posting not only helps to retain your existing audience but also to attract new visitors through search engines.
9. Can I start a blog without any technical skills?
Absolutely. Many blogging platforms, like WordPress, are designed for non-technical users. They offer user-friendly interfaces, drag-and-drop builders, and a plethora of plugins that automate many technical tasks.
10. What are the best themes for a WordPress blog?
The best theme for your WordPress blog depends on your niche and personal preferences. Some popular free themes include Astra, OceanWP, and Neve. These themes are mobile-friendly, SEO-optimized, and highly customizable.
11. Is blogging still profitable in 2023?
Yes, blogging is still profitable in 2023. As long as there are people searching for information, advice, and products online, there will be opportunities for bloggers to make money. However, the key to successful blogging is to provide valuable, unique content that resonates with your target audience.
12. How much does it cost to start a blog?
The cost of starting a blog can vary greatly depending on your needs and choices. The basic costs include domain registration (around $10-$15 per year) and web hosting (can range from $3 to $25 per month or more). Additional costs might come from premium themes or plugins, professional branding, or marketing tools and services.
13. How can I grow my blog audience?
Growing your blog audience involves consistent high-quality content production, search engine optimization, networking with other bloggers, guest posting, and active participation on social media platforms.
Engaging with your readers by responding to comments and emails is also essential.
14. What is affiliate marketing and how can it help me make money?
Affiliate marketing involves promoting products or services by other companies on your blog.
When your readers click on the affiliate links in your blog and make a purchase, you earn a commission. It can be a great source of passive income, but it requires you to build a considerable and engaged audience first.
15. What’s the importance of SEO in blogging?
SEO is essential in blogging as it helps improve your blog’s visibility on search engines. This includes using keywords in your content, optimizing page titles and meta descriptions, using SEO-friendly URLs, and ensuring your site is mobile-friendly.
SEO can help attract organic or non-paid traffic to your blog, which is a key factor in monetization.
16. How do I keep my blog content engaging?
To keep your blog content engaging, write about topics you’re passionate about and knowledgeable about. Use a conversational tone, include personal anecdotes, and try to provide actionable advice or insights.
Visuals such as images, infographics, or videos can also enhance engagement.
17. What’s the importance of a mobile-friendly blog?
With an increasing number of users accessing the internet via mobile devices, having a mobile-friendly blog is crucial. It ensures that your blog looks good and functions well on all devices, enhancing the user experience. Google also ranks mobile-friendly websites higher in search results.
18. How can I handle negative comments or feedback on my blog?
Negative feedback can be an opportunity for growth. Consider if the feedback could help improve your blog or content. Approach negative comments professionally and objectively.
Remember, not all criticism is constructive, and it’s important to differentiate between helpful feedback and internet trolling.
19. How long does it take to earn money from a blog?
It varies for every individual and depends on numerous factors, including your niche, content quality, SEO efforts, frequency of posting, and audience engagement. It might take several months to a year or more to earn a consistent income from your blog.
20. What’s the role of social media in blogging?
Social media can play a crucial role in promoting your blog and engaging with your audience. Sharing your blog posts on social media platforms can drive more traffic to your blog.
It also allows you to interact with your readers on a more personal level.
21. Do I need to know how to code to start a blog?
Not at all. While understanding some basic HTML or CSS can help with customization, most blogging platforms, like WordPress, offer plenty of themes and plugins that require no coding knowledge. These tools can help you create and manage a professional-looking blog with ease.
Ready to Start a Blog?

By now, you should have a better grasp of the world of blogging, from brainstorming ideas to optimizing posts for SEO and all the strategies in between.
Blogging isn’t merely about sharing your thoughts; it’s about building a community, inspiring change, and even making a decent living.
But before you get caught up in the sea of exciting possibilities that come with launching a blog, it’s vital to get your foundation right.
And that starts with choosing a reliable hosting service. This is where Bluehost shines brightly.
Bluehost, one of the most reputable names in the blogging community, has earned its stripes by consistently delivering exceptional service. The platform is known for its robust reliability, lightning-fast speeds, and round-the-clock support, making it a go-to choice for many successful bloggers.
A good hosting service like Bluehost is like having a solid foundation for your house. You need it to keep everything stable, secure, and operating smoothly. Think of it as your blog’s backbone – it’s there, keeping everything together while you pour your creativity into crafting compelling content.
Moreover, Bluehost offers user-friendly features that make the whole process a breeze, even for beginners. This means you can focus more on your content and readers and less on the technical side of things. And trust us, in the dynamic world of blogging, having a hosting service that’s got your back can make a world of difference.
But what’s more, Bluehost grows with you. Whether you’re just starting and need basic hosting or a seasoned blogger ready to scale up, this web hosting service has a plan tailored to your needs. This flexibility makes it a reliable companion on your blogging journey, ready to adapt and expand as your blog evolves.
Now, let’s think about the grand scheme of things. Imagine having a platform where you can connect with people who share your interests or experiences. Picture creating content that resonates with your audience and inspires them. Visualize generating income from doing something you truly love. This could be your reality with a blog.
So, are you ready to jump into the world of blogging?
It’s time to stop dreaming about your perfect blog and take the first step in making it a reality.
With Bluehost, your dream blog is more than possible—it’s within reach.
Click here to embark on your blogging journey with Bluehost today! Your audience is waiting.


