You may have wondered how to bridge your WordPress website with the world of Pinterest. Well, adding the Pinterest HTML tag to your WordPress site is like giving your website a VIP pass to the Pinterest party.
Creating a Pinterest account is the primary step, but integrating it with your WordPress website by adding the Pinterest HTML tag is where the magic really happens.
This small piece of code is a powerful tool, unlocking a suite of features like detailed analytics, richer pins, and more control over how your content appears on Pinterest.
In this guide, I’ll walk you through step-by-step instructions on how to add Pinterest HTML tag to WordPress website.
Whether you’re an experienced blogger or just beginning, you’ll see it’s simpler than you might think. So, let’s roll up our sleeves and get your site Pinterest-ready!
Understanding The Pinterest HTML Tag

Imagine the Pinterest HTML tag as your website’s digital handshake with Pinterest.
It’s a small but significant gesture that establishes a trusted connection between your site and your Pinterest business account.
Unlike a personal account, a business account proposes a wealth of tools and insights, and the HTML tag is your key to unlocking these features.
So, What is a Pinterest HTML Tag?
The Pinterest HTML tag is a snippet of code that you add to the HTML of your website. This tag is unique to your Pinterest business account.
It acts as a beacon, signaling to Pinterest that your website is authentic and officially connected to your account. Once added, it stays quietly in the background, linking your website URL with your Pinterest profile.
The Role of the Pinterest HTML Tag
- Website Verification: Adding the HTML tag to your website and verifying it on Pinterest establishes ownership.
It’s like planting your flag on a digital land, claiming your space in the vast Pinterest universe.
- Access to Analytics: With your website verified, you unlock Pinterest’s analytics tools.
This means you can dive into detailed data about how users interact with your pins and which content resonates the most, helping you refine your strategy and grow your presence.
- Enhanced Pinning Features: The HTML tag also enables richer pins. These are pins that provide more information directly from your site, like article titles, product prices, and availability.
Rich pins update automatically, keeping your content fresh and relevant on Pinterest.
- Boosted Credibility and Visibility: A verified website adds credibility to your Pinterest profile.
It assures users that your content is reliable, potentially leading to increased engagement, more followers, and a stronger presence on the platform.
In essence, adding the Pinterest HTML tag to your WordPress site is a small step that can lead to significant gains.
It’s not just about linking two platforms; it’s about opening a channel for enhanced visibility, deeper insights, and a richer user experience.
As you move on to the actual steps of integrating this tag, remember that you’re setting the stage for your content to shine and your presence on Pinterest to flourish.
What To Do Before Adding the Tag

Before you can add the Pinterest HTML tag to your WordPress website, there are a few preparatory steps you need to take. Think of it as setting the stage before the main event.
These steps ensure that when you do add the tag, everything goes smoothly, and you’re ready to reap the full benefits of showcasing your website on Pinterest.
1: Create a Pinterest Business Account
If you don’t already have a Pinterest business account, it’s time to set one up. It’s a straightforward process:
- Visit Pinterest for Business: Click ‘Join as a Business.’ Once you are on the Pinterest for Business page. Fill in details about your business and your personal details.
Remember, a business account is different from a personal account, offering features tailored for businesses and content creators.
- Complete Your Profile: Upload a profile picture, preferably your business logo, and complete your bio with information about your business.
This helps users understand who you are and what your brand represents.
- Confirm Your Email: Pinterest will send you an email to confirm your account. Use the link to confirm your email.
2: Claim Your Website on Pinterest

Once your business account is set up, the next step is to claim your website.
This process confirms your ownership of the website and allows you to generate the HTML tag you’ll need.
- Access Settings: Log into your Pinterest business account, click on the dropdown menu in the upper right corner, and select ‘Settings.’
- Claim Website: In the settings menu, find the ‘Claim’ section. Enter your website’s URL in the Claim your website field.
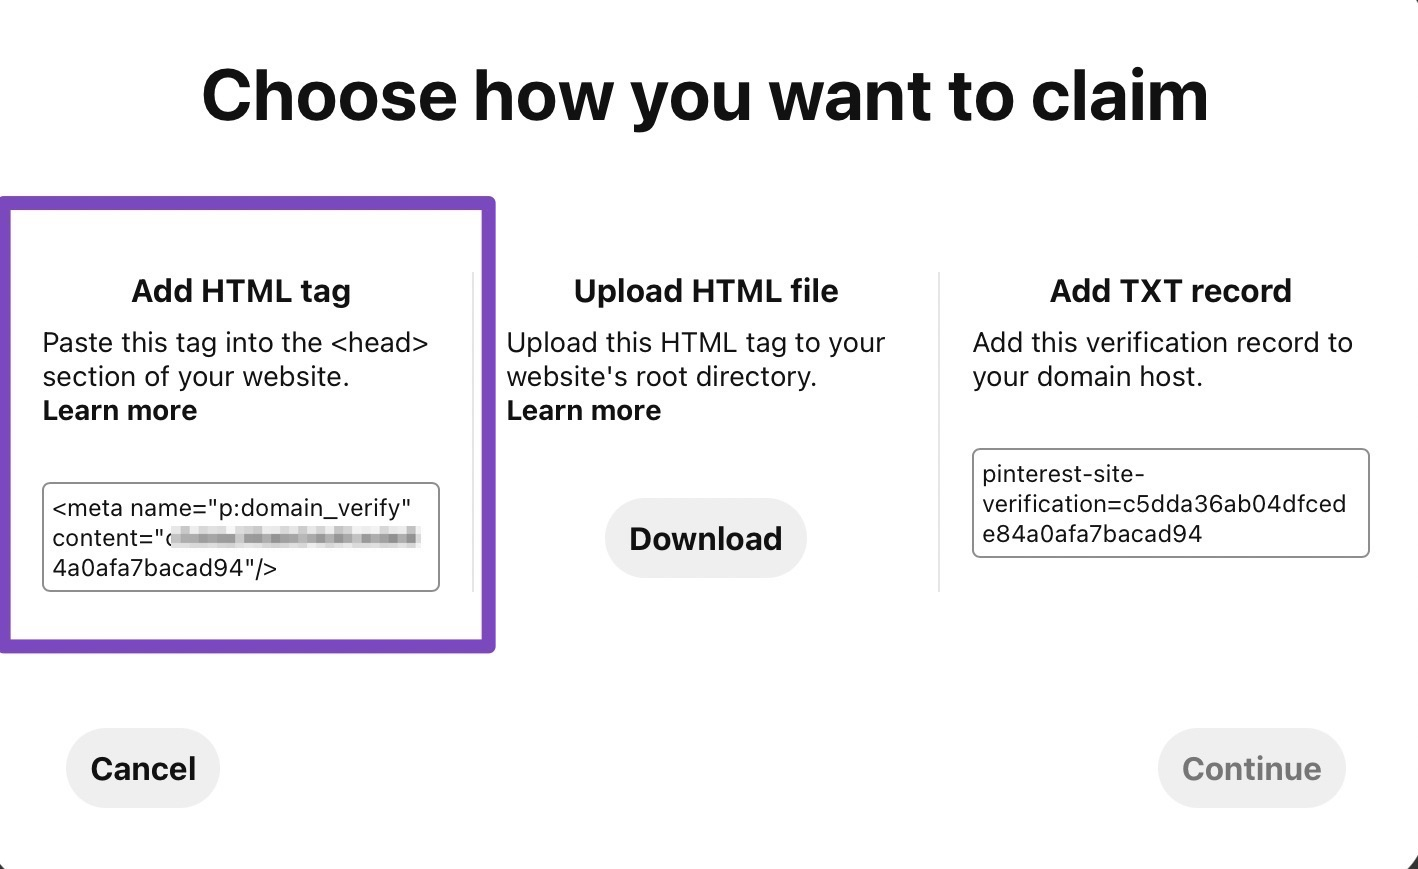
- Choose a Verification Method: Pinterest offers several methods to verify your website. The simplest is to upload an HTML file to your website’s root directory.
Alternatively, you can add an HTML tag (which we’ll be focusing on in the upcoming steps) or include a DNS TXT record to your domain’s DNS configuration.
- Generate HTML Tag: If you choose to add an HTML tag, Pinterest will generate a unique tag for you. Copy this tag, as you’ll need to add it to your WordPress site.
With your Pinterest business account set up and your website claimed, you’re now ready to integrate the Pinterest HTML tag into your WordPress site.
These initial steps are crucial in ensuring that the connection between your website and Pinterest is secure, verified, and primed for success.
It is now time to dive into how to include the HTML tag to your WordPress site.
How To Add HTML Tag To WordPress

Now, let’s officially bring your website into the Pinterest fold.
Step 1: Access Your WordPress Site
Now that you’ve got your business Pinterest account ready and your unique Pinterest HTML tag in hand, it’s time to dive into your WordPress site.
This initial step is all about getting inside the engine room of your website—your WordPress dashboard.
It’s here that you’ll make the magic happen, linking your WordPress website on Pinterest for a wider audience to discover and enjoy.
1. Log in to Your WordPress Dashboard
- Find Your Login URL: Typically, you can access your WordPress login page by adding ‘/wp-admin’ to the end of your website’s URL (e.g., www.yourwebsite.com/wp-admin).
- Insert Your Credentials: On the login page, insert your username and password. If you’ve forgotten these, don’t worry! Just click the link ‘Lost your password?’ to reset it.
- Navigate to the Dashboard: Once logged in, you’ll find yourself on the dashboard. This is the control center for your site, where you can build new posts, add pages, and, crucially, edit your site’s code to add the Pinterest HTML tag.
2. Back Up Your WordPress Site
Before you proceed to upload the Pinterest HTML file or make any changes to your site, it’s wise to back everything up.
Think of it as taking a snapshot of your site so that if anything goes awry, you can reinstate it to its former glory.
- Use a Plugin: Plugins like UpdraftPlus or BackupBuddy make backing up your site straightforward. They allow you to schedule backups and store them in a location of your choice, like Dropbox or Google Drive.
- Manual Backup: If you prefer to do things manually, you can use your hosting control panel to create a backup. Tools like cPanel typically offer a Backup Wizard that guides you through the process.
With these preparations in hand, you’re now ready to proceed with confidence. In the next step, we’ll tackle the heart of the matter—adding the Pinterest HTML tag to your WordPress site.
Remember, these initial steps are crucial for a smooth and secure integration of your WordPress website on Pinterest, setting you up for success as you showcase your site to a broader audience.
Step 2: Add the Pinterest HTML Tag to WordPress

Having navigated the dashboard of your WordPress site and ensured everything is backed up, you’re now ready to take the crucial step of integrating the Pinterest HTML tag.
This tag is your golden ticket to verifying your site with Pinterest, opening up a world of analytics, rich pins, and more. Let’s dive into the process.
1. Locate the Header Section in WordPress
- Access Theme Editor: From your WordPress dashboard, go to Appearance and then Theme Editor. This is where you can edit the HTML of your theme directly.
- Find the Header File: Look for the header.php file in the outline of theme files. This file usually contains the section of your site where the Pinterest HTML tag needs to go.
2. Add the Pinterest HTML Tag
- Insert the Tag: Once you have the header.php file open, locate the <head> section.
Carefully paste the Pinterest HTML tag (the meta tag provided by Pinterest) just before the closing </head> tag. - Save Your Changes: After adding the HTML tag, make sure to save your changes. There should be an Update File button at the bottom of the editor.
3. Using a Plugin for Non-Coders
If diving into code isn’t your cup of tea, there’s an easier way. You can make use of a plugin like Insert Headers and Footers to add the Pinterest HTML tag without touching the code.
- Fix the Plugin: Go to Plugins, then Add New, and search for Insert Headers and Footers. Install and activate the plugin.
- Add the Tag via the Plugin: Once activated, navigate to Settings and then Insert Headers and Footers. You’ll find fields where you can paste scripts into the header or footer.
Paste your Pinterest HTML tag in the Scripts in Header section. - Save: Don’t forget to save your changes.
Adding the Pinterest HTML tag to your WordPress site is like connecting two powerful digital forces.
Whether you choose to dive into the code or use a plugin, this step is pivotal in solidifying your site’s presence on Pinterest.
In the next section, we’ll make sure everything’s set by verifying your site with Pinterest, marking the beginning of a new chapter in your site’s journey on this vibrant platform.
Step 3: Verify the Pinterest HTML Tag

After successfully adding the Pinterest HTML tag to your WordPress site, the final step in this journey is to verify the tag with Pinterest. This is like showing your invitation at the door of an exclusive event.
Once Pinterest sees that invitation – your HTML tag – you’re officially recognized and can enjoy the benefits of a verified website, like detailed Pinterest analytics.
Let’s go through the verification process and address any potential bumps along the way.
1. Verify Your Website on Pinterest
- Return to Your Pinterest Account: Log into your Pinterest business account and navigate to the Settings menu.
- Go to the Claim Section: Once in Settings, find the Claim section where you initially entered your website URL.
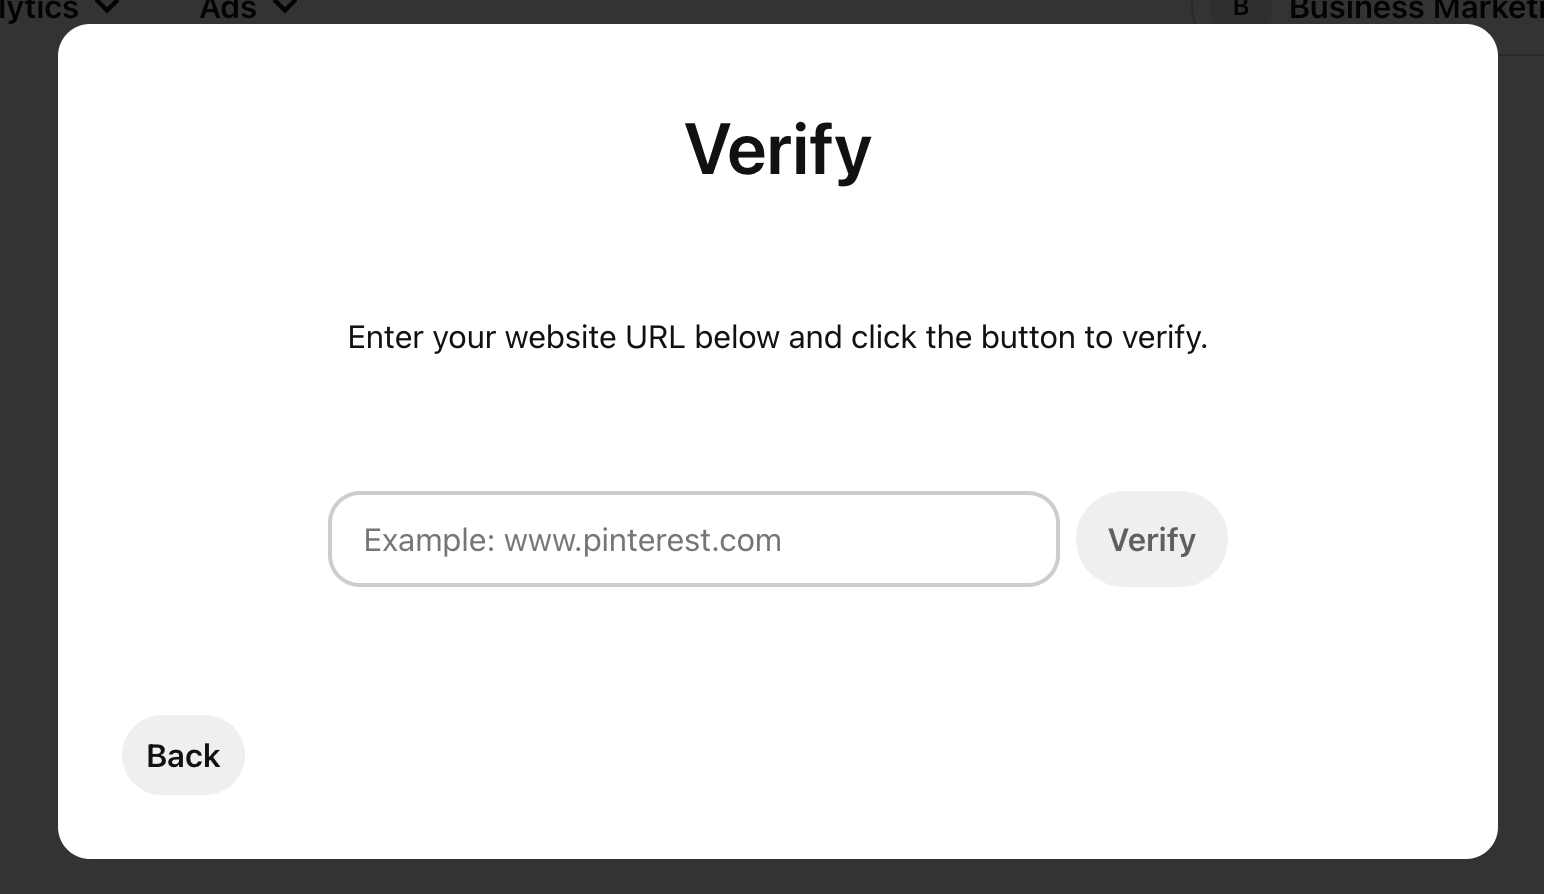
- Click Verify: Next to your website URL, there should be a Verify button. Clicking this tells Pinterest to check your website for the HTML tag you added.
- Wait for Confirmation: After you click Verify, Pinterest will scan your website for the HTML tag. If everything’s in order, you’ll receive a confirmation that your website is verified.
2. Troubleshoot Tips
If the verification doesn’t go through, don’t worry. Here are some troubleshooting tips:
- Check the Tag Placement: Return to your WordPress site and ensure that you’ve placed the HTML tag in the correct section of your site’s header.
- Clear Cache: If you’re using a caching plugin on your WordPress site, clear the cache. Sometimes, cached versions of your site can prevent Pinterest from seeing the most recent changes.
- Revisit Pinterest Settings: Double-check that you’ve entered the correct website URL in your Pinterest settings and that there are no typos or errors.
- Wait a Little Longer: Sometimes, it takes a bit of time for changes to propagate and for Pinterest to recognize the HTML tag. Give it a little time, then try verifying again.
- Contact Support: If you’re still facing issues, don’t think twice to reach out to Pinterest’s support team. They can offer assistance and support to resolve any problems.
Successfully verifying your website with Pinterest opens up a whole new world of possibilities.
With your site verified, you can dive deep into Pinterest analytics, understand how users interact with your content, and refine your Pinterest strategy for even greater success.
Remember, this verification is a vital step in fully integrating your WordPress website with your Pinterest tab, marking your official presence on the platform, and setting the stage for growth and engagement.
How to Optimize Your Site for Pinterest

With your WordPress site now proudly wearing the Pinterest HTML tag, you’re all set to make waves on Pinterest.
But why stop there? Let’s turn the tide in your favor by optimizing your site to be as Pinterest-friendly as possible.
By enhancing your site’s content and structure, you can attract more pinners, drive more traffic, and ensure that your presence on Pinterest translates into tangible results.
Here are some top tips to make your WordPress site a Pinterest powerhouse.
1. Use High-Quality Images
- Focus on Visual Appeal: Pinterest is a visual platform, so high-quality, eye-catching images are your ticket to getting noticed.
Ensure your blog posts and pages feature compelling images that invite users to pin and share.
- Use the Right Dimensions: Pinterest favors vertical images. Plan for an aspect ratio of 2:3 (for example, 1000×1500 pixels) to make sure your images look great on Pinterest boards.
2. Add ‘Pin It’ Buttons
- Make It Easy to Pin: By adding the Pin It buttons to your site, you make it very simple for visitors to share your content on Pinterest.
You can use plugins like jQuery Pin It Button for Images to add these buttons to your images.
- Customize Your Buttons: Customize the look and placement of your ‘Pin It’ buttons to match your site’s design and user experience.
The easier and more intuitive it is to pin content from your site, the more likely visitors are to do it.
3. Optimize Post Titles and Descriptions
- Be Descriptive and Engaging: When pinners find your content on Pinterest, the title and description are what catch their attention. Make sure your WordPress post titles and descriptions are clear, engaging, and reflective of the content.
- Use Keywords Wisely: Just like with SEO for Google, using relevant keywords in your titles and descriptions can help your pins get discovered on Pinterest. However, keep it natural and user-friendly.
4. Integrate Pinterest Analytics
- Track Your Performance: With your website verified, you can use Pinterest analytics to check how your content performs on the platform. Use these insights to understand what works, what doesn’t, and how you can improve.
- Link with Google Analytics: For an even more comprehensive view, integrate your Pinterest account with Google Analytics. This lets you see how Pinterest traffic behaves on your site and contributes to your goals.
By implementing these strategies, you’re not just optimizing your site for Pinterest; you’re setting the stage for more engagement, more traffic, and, ultimately, more success.
Remember, every Pin It click, every high-quality image, and every well-crafted title is a step towards making your WordPress site a favorite among Pinterest users.
So, upload HTML file, tweak that Pinterest meta tag, and watch as your site becomes a Pinterest sensation!
Conclusion: How to Add Pinterest HTML Tag to WordPress

Throughout this guide, we’ve navigated the waters of how to add the Pinterest HTML tag to WordPress, transforming your site into a Pinterest-friendly haven.
From creating a business account and claiming your website to uploading the HTML file and adding the HTML meta tag, each step has been a building block towards a robust Pinterest presence.
Remember, integrating Pinterest with your WordPress site is more than just a technical task; it’s about opening a channel for creativity, engagement, and growth.
By following the steps outlined and embracing the tips for optimization, you’re not just adding an HTML tag; you’re setting the stage for your content to thrive on one of the most vibrant visual platforms out there.
So, take a moment to appreciate the journey you’ve embarked on. With the Pinterest HTML tag neatly tucked into your WordPress site, you’re now ready to captivate, connect, and convert like never before.
Here’s to your success on Pinterest, and may your pins shine brightly in the digital mosaic of creativity and sharing!


