WordPress is an open-source, flexible, and powerful content management system. A significant amount of websites globally are WordPress sites. The site is easily accessible and usable, especially for those who use it to publish blog content.
But some elementary but hidden things like WordPress screen options may be confusing. This requires some getting used to over time to be able to grasp it in full.
This article will explain all that you need to know about the WordPress screen option.
What is Screen Options in WordPress?
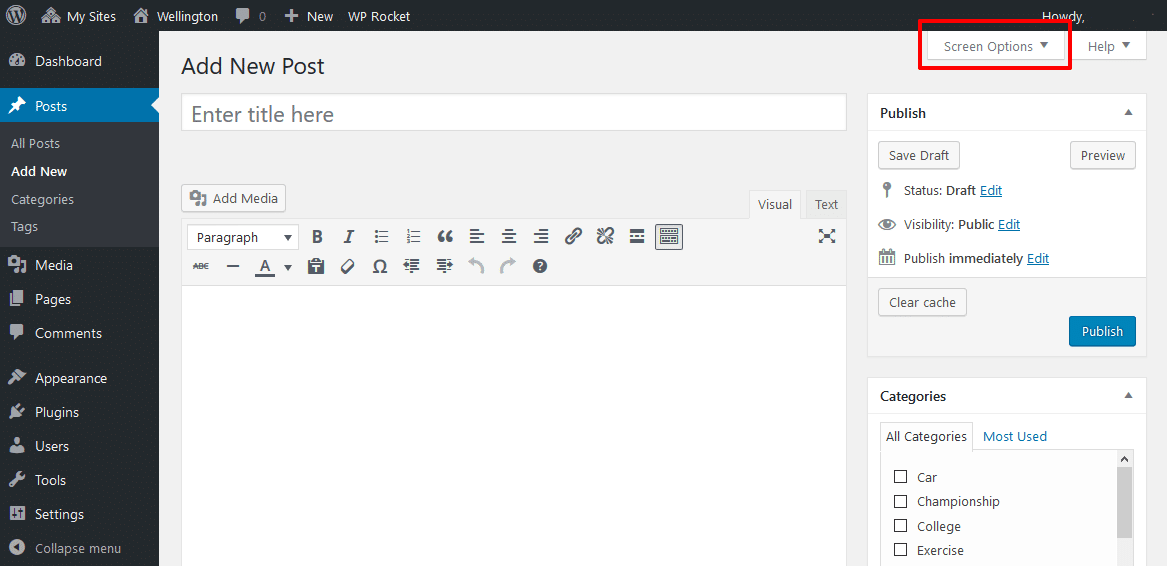
Screen options is a drop-down menu icon found on the upper right corner of some pages in your WordPress admin dashboard. When you click on it, the menu displays options to set the view of that page.
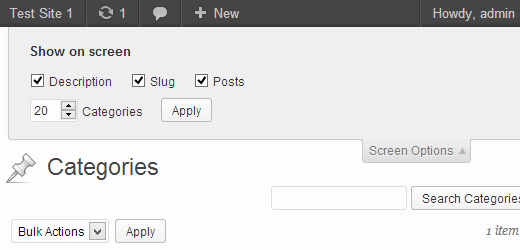
The Screen Options usually contain checkboxes that help to display or hide various segments of an admin screen. It can also include the choice to select the amount of items to show on the admin screen.
The options in the Screen options menu are different on different admin screens. And having screen options allows you to have full control. With the screen options, you can showcase, hide, and personalize segments on the admin screen.
For instance, in the WordPress edit post screen, you can decide to hide the comment meta box, category selector, or custom areas from the post edit screen if it is not used frequently.
How To Use The Screen Options Tab in WordPress
As stated above, this WordPress feature can do multiple functions. It can display hidden options, view extra settings and functions, and modify several areas of your WordPress administration section.
Let’s walk you through how to display customized sections and hidden options on your dashboard and how to customize your WordPress display pages.
1. Show Hidden Options and Customize Segments of your WordPress Dashboard
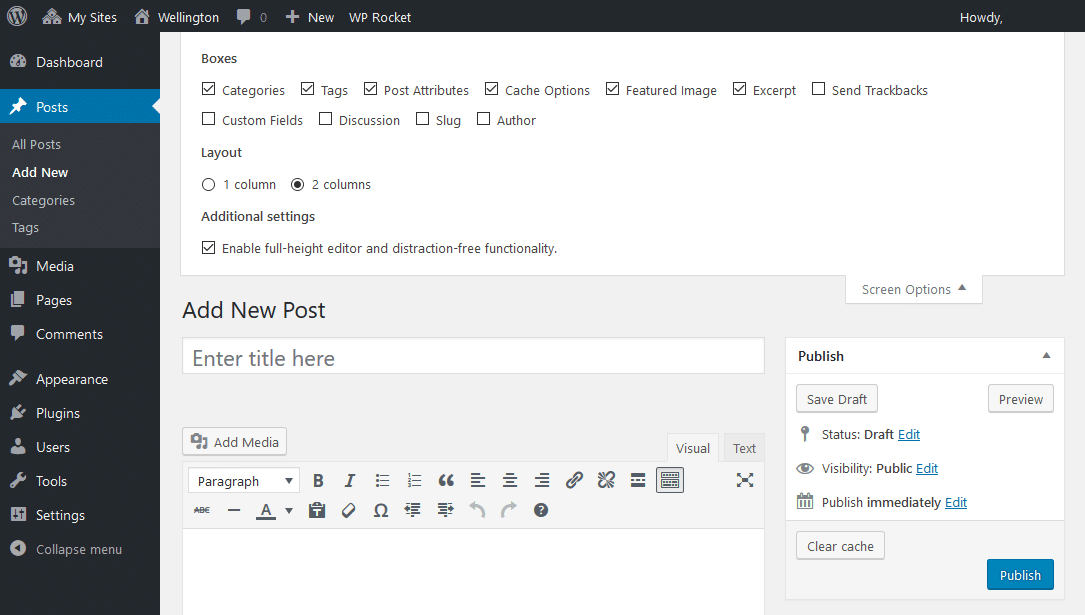
When next you log into your WordPress Dashboard, you will see a screen options tab at the top right corner of your screen.
So, based on the particular WordPress you are working on and what plugins are installed on your website, selecting the screen options tab will display a selection of extra unseen options for the particular section.
Ticking and unticking the checkboxes in the screen options tab allows you to hide or reveal features accessible for that section. The settings can also be changed in the tab, like the number of items to show in a list in several ways.
For instance, on your dashboard, the options to show or hide information panels will be seen on the dashboard widgets.
So, if you are observing your Posts screen, fields like categories, pagination, author, view mode, etc, will have options to display or hide them. Also, if you are editing a post, options connected to revealing or hiding items on the post editor screen can be seen, like revisions, excerpts, featured images, comments, etc.
Most of the time, selecting or unselecting the checkboxes in the screen options tab will showcase or hide the screen element instantly. There are some alternatives that require you to select the ‘Apply’ button to set up the screen.
In addition, the screen options tab will now show if there are no available selections for a particular screen or section. So, whenever you are working in your WordPress admin area, and you can’t seem to find what you are seeking, check the screen tab options.
It’s most likely that what you are seeking is available, but you can’t see it from your point of view.
2. Customizing your WordPress display pages
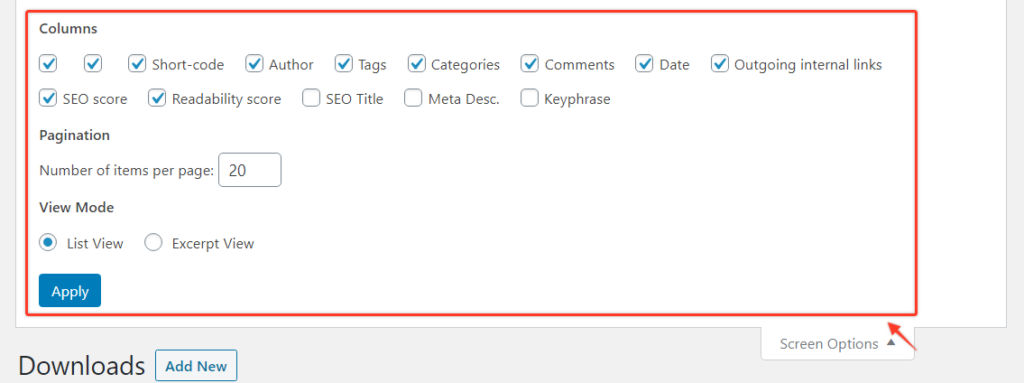
Screen options perform a vital function in WordPress, but they are mostly ignored. It is that edit page that is visual, but since you don’t engage with it often, you forget it is there.
The useful function the screen option performs in WordPress is the ability to customize the display page in the WordPress admin.
The Screen Option tabs show at the top right corner of WordPress pages. But it performs different functions based on the specific page you are on. Overall, it lets you modify to taste the way information is displayed in the admin.
For instance, on the All Posts page, you can adjust what column should be displayed in the post menu and the number of posts for each page to appear. On the Edit Post screen, the display of the meta boxes can be moved. You find it close to the Help tab.
How to Work With Screen Options
To work with Screen Options, you need to register your screen options first, just like you do any other thing in WordPress.
Virtually all the documents will offer an illustration of how you are doing per_page as the initial value to add_screen_option.
On the developer reference page, it gives no extra assistance. It only says the value is “an option name.” But in all honesty, the value can be anything you wish.
It is basically an indicator of the option you want to save. It is used when you want to engage with the WP_ Screen object to retrieve your options.
The next factor of add_screen_option is the information you wish to save. This can also be anything. The needs of your project will be the only limitation. This method gives you absolute power and control. You decide how you want your screen options to perform.
The answer to this question shows research effort, and if it is not the answer you expect, you can use the related question feed default given on SERP.
Making Use of Screen Options
Now, the point of concern is how you make use of the data you are saving to screen options. The screen options data are saved and stored in the user meta box. This implies that another user’s settings will not be the same as another user’s settings.
This is good because the admin area of each user can be customized. But if the screen options have not been saved, you will need to take control of the default display because the user meta won’t exist.
How Do The Meta Boxes in Screen Options Work?
Once you click on the Screen Options tab, there will be options displaying the list of checkboxes relating to the meta boxes for the existing screen. So, the meta boxes clicked on will be shown, while the ones not clicked on will not be displayed.
A meta box you don’t want to see can be safely hidden without any repercussions. This is because the meta box hidden from view will not affect the performance linked to the meta box.
In addition, your meta box display choices will be remembered and applied to you only. This way you can securely hide it without impeding other users.
But not all meta boxes can be seen by default. For instance, the “Author” meta box lets you modify the page or post author.
This Is very helpful if you are including a blog post for someone else and you want their name to be displayed so visitors can view them. You won’t need the following: a sign-in detail like a password, submit post clearance, and other requirements.
Conclusion

Screen options in WordPress help you show, hide, and customize your admin dashboard, as we have shown you here.
Scattered around the WordPress screen options admin page, you will find a number of meta boxes that have data or options linked to the currently viewed screen.
So, the screen options tab found at the top right corner of the admin screen controls the display of these meta boxes.
For instance, when you open your dashboard, you will notice several meta boxes for posts recently published or WordPress news. So when you edit a post, you will see Categories and Tags meta boxes. They can all be seen or hidden based on your display preferences.


