One time, I almost lost a brilliantly written blog post – a tale of tragedy, redemption, and a lesson learned. It was a sunny afternoon, and I was typing away, my ideas flowing like a river.
But then, disaster struck. I accidentally closed the browser without saving it. My heart sank. That’s when I discovered my knight in shining armor: the WordPress draft feature.
WordPress drafts are like those friends who remember your birthday when even you forget it. They’re there to save your day and, more importantly, your content. Draft status in WordPress is a lifesaver, holding onto your precious words even when you’re not ready to hit publish.
In this post, we’ll dive into the world of WordPress drafts. I’ll show you how to navigate this feature, ensuring that your brilliant ideas are never lost in the abyss of forgotten browser tabs again. Let’s get started and make sure your drafts are always right where you need them!
What’s this WordPress Draft Thing All About?
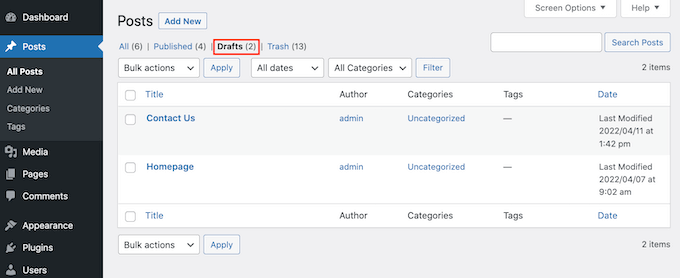
A WordPress draft is a version of your content – be it blog posts or pages – that is saved but not yet published.
It’s like having a sketchpad where you can freely jot down ideas, make edits, and refine your content without the pressure of it being live for the world to see.
Why Use Drafts?
Draft posts in WordPress are invaluable for several reasons. They allow you to:
- Save your work-in-progress without publishing it.
- Revisit and revise your content before it goes live.
- Plan and prepare your content strategy by having several drafts at different stages of completion.
Drafts for WordPress Pages
Just like posts, WordPress pages can also be saved as drafts. This is especially useful when you’re creating important pages like your homepage, contact page, or service pages that need extra attention and fine-tuning before going public.
In short, WordPress drafts give you the freedom to create, edit, and perfect your content in your own time. In the next sections, we’ll explore how to find and manage your saved draft posts.
Finding and Managing Saved Drafts
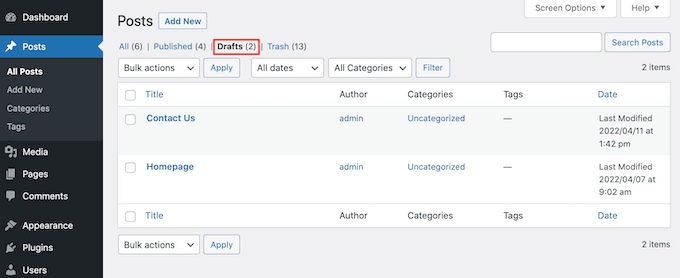
Navigating through the backend of your WordPress website can feel like exploring a maze at times, especially when you’re trying to locate your saved draft posts.
Whether it’s a blog post for your own blog or a page for your website, keeping track of drafts is key to a streamlined workflow. Here’s how you can easily find and manage those drafts:
Finding Your Drafts:
- Log in to your WordPress website and head over to the Dashboard.
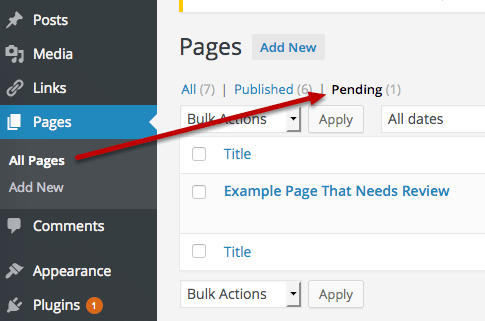
- Click on ‘Posts’ if you’re looking for blog drafts or ‘Pages’ for page drafts.
- Here, you’ll see a tab labeled ‘Drafts.’ Click on it, and voilà! All your saved draft posts or pages will be listed there.
Managing Drafts:
- Organization is crucial when managing multiple drafts. Consider categorizing your drafts or adding descriptive titles to make them easily identifiable.
- Regularly review your drafts. Sometimes, an old draft can inspire new ideas or can be repurposed for your current needs.
- Don’t forget to delete drafts that you no longer need. This helps keep your workspace clutter-free and focused.
Remember, your WordPress drafts section is like a treasure chest, holding the gems of your unfinished thoughts and ideas. By keeping it organized and revisiting it often, you can turn these rough drafts into polished, published pieces for your own blog or WordPress website.
How to Create a Draft in WordPress
Creating a draft in WordPress is the first step in your journey to create content that captivates your audience. It’s a straightforward process, but knowing a few tricks can save you from the dreaded ‘accidentally deleted’ scenario.
Here’s how to get started:
- Start a New Draft:
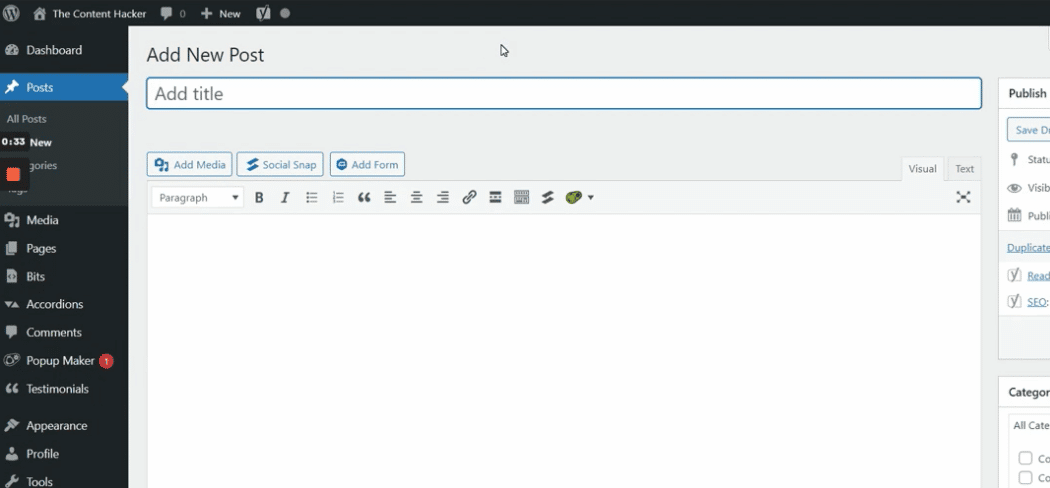
Log into your dashboard on WordPress and navigate to the ‘Posts’ or ‘Pages’ section.
Click on ‘Add New’ to open a fresh editor window. This is your canvas to create content.
- Save Your Work:
As you start typing, WordPress automatically saves your work. However, it’s good practice to manually click the ‘Save Draft’ button periodically, especially after making significant changes.
If you ever need to leave your post, just click ‘Save Draft.’ This ensures your work is securely stored, even if you accidentally close the browser.

- Setting Your Post Status:
In the document settings on the right, you’ll see an option to set the status of your post.
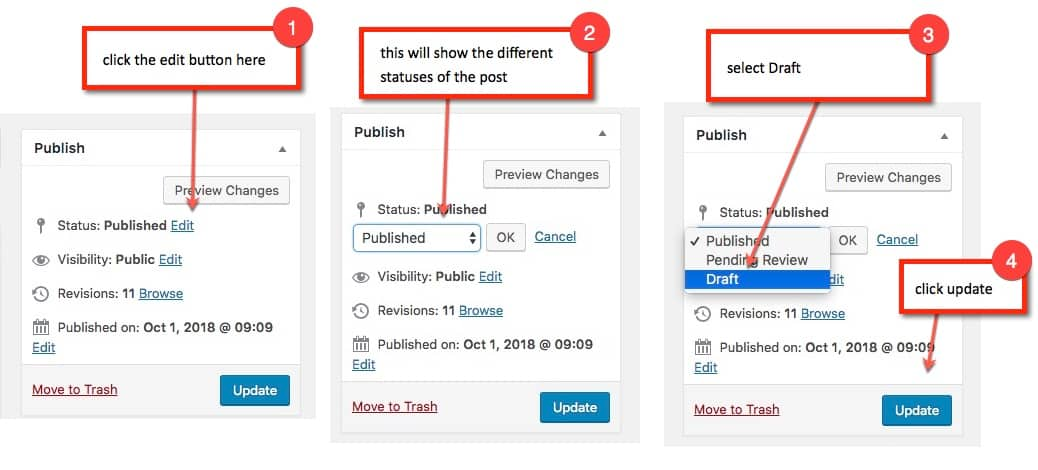
If your post isn’t ready for the public eye yet, keep it as a ‘Draft.’ If it’s almost ready but needs a final review, you can set it to ‘Pending Review.’
- Switching to Draft:
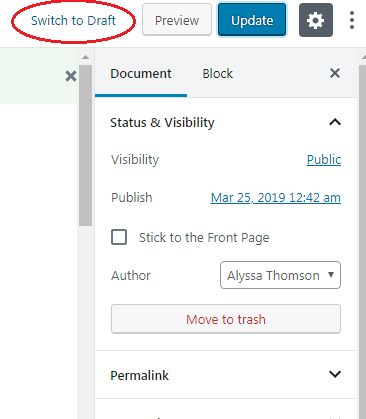
If you have a published post that needs reworking, you can switch it back to draft. Just click on the post, then select ‘Switch to Draft‘ in the post editor. This takes the post off your live site and back into your drafts, where you can make your edits.
Remember, drafts are your safety net in WordPress. They allow you to create, edit, and refine at your own pace without fear of losing your work. So go ahead, start drafting, and let your creativity flow!
Editing and Publishing Drafts
Once you’ve mastered the art of finding your saved WordPress posts, the next step is turning those draft posts into published masterpieces.
It’s where the magic happens – transforming your ideas into content that the world can see. Let’s break down how you can edit and publish these drafts:
Editing a Draft Post:
- Navigate to the ‘Drafts’ section under ‘Posts’ in your WordPress dashboard.
- Click on the draft post title you want to work on. This will open the post editor.
- Here, you can add more content, revise what you’ve written, or change the formatting. WordPress offers a user-friendly editor that makes these tasks straightforward.
- Don’t forget to periodically click the ‘Save Draft’ button as you make changes. It’s your best friend in safeguarding your progress.
Publishing Your Draft:
- Once you’re satisfied with your post, it’s time for the world to see it.
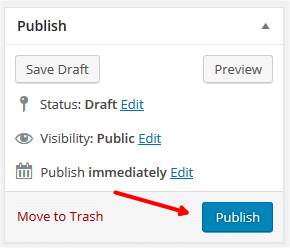
- Look for the ‘Publish’ section on the right-hand side of the editor. Here, you can set the visibility of your post and decide when you want it to go live.
- If you’re all set, hit the ‘Publish’ button. If you’re scheduling it for later, choose the date and time, and then click ‘Schedule.’
And there you have it! With a few clicks, your draft post transforms from a covered gem to a shining star on your WordPress site. Remember, the ‘Save Draft’ and ‘Publish’ buttons are the start and finish lines of your content race. Use them wisely, and watch your blog grow!
Conclusion: Mastering the WordPress Draft

As we wrap up our exploration of the WordPress draft feature, it’s clear that understanding and effectively utilizing drafts is key to a smooth and stress-free content creation process.
Whether you’re working on a new post or crafting a page, drafts in WordPress offer you the flexibility to create, edit, and refine your work at your own pace.
Remember, every great post or page starts as a draft. It’s your creative playground, a space where ideas can be safely stored and nurtured until they’re ready to bloom.
So, embrace the power of the WordPress draft. Let it be the foundation on which you build your compelling stories and informative content.
Happy drafting, and here’s to creating content that resonates and engages!


